Patching E-Business Suite with more comfort - part 2 notifying with PuTTY

Patching E-Business Suite with more comfort - part 2 notifying with PuTTY

Johannes Michler PROMATIS Horus Oracle


Executive Vice President – Head of Platforms & Development

Every quarter Oracle releases a bunch of Critical Patch Updates that have to be applied to (often many) E-Business Suite instances. While the patch application is highly automated through the adop utility, there are two (little) things that always annoyed me when patching:

  • You have to provide the apps, ebs_system and weblogic password on every adop command
  • You have to re-check your terminal connection to check if a certain step completed

This first part of this blog post series covered how we can easily pass the passwords to adop; in this second part I will show how notifications can be brought to your attention quickly once the patching is completed.

Notifications to PuTTY

It is often inconvenient that after kicking off the adop process (or something similar long-running) you have to re-check the PuTTY terminal over and over again to check if the process completed. Luckily PuTTY has the capability to "flash the task bar" as well as "play a sound" whenever a so call "bell-event" is produced on the remote session. The behavior of putty is controlled through those settings:


Settings for PuTTY to play the standard system alert sound as well as flash the task bar

With those setting in place you should be able to perform a test with the following command:

sleep 3; echo -e "\a"

Then quickly navigate away from the putty window and you should see the Putty Window flashing as well as a "dong" sound ringing:


Flashing Putty Window

Bell with screen

Typically I like to not start adop (or other long running processes) directly but I use a "screen" (https://www.gnu.org/software/screen/) session to start the process. In that way should my internet or VPN connection break down the process continues and I can reattach to the session.

Unfortunately screen does some "special" handling of the "bell" event which in the original configuration I found in my "jump host" from where I connect to the E-Business Suite environments screwed the putty notification of the bell event. To fix this I created a ~/.screenrc file as follows:

[opc@ebscm2 ~]$ cat .screenrc
bell_msg "Bell in window %n ^G"
vbell off

The first command sets the bell_msg to both contain a visual hint in which of potential multiple (background) windows of you screen session a bell event happened. The final ^G makes sure that another "bell" event is raised through that notification. With this setting you make sure that a background bell is actually passed on to PuTTY.

The second setting controls the foreground screen session. By disabling the visual bell (flashing of screen window) a regular bell is passed to the terminal.

The combination of those settings allow bell signals to be propagated to the PuTTY terminal both in foreground and background screen windows. Before continuing, it is a good idea to test both with the above mentioned echo command.

Creating a custom myadop.sh script

Based on this I extended the myadop.sh script from my first blog post by the last line:

[oracle@prod122app01 ~]$ cat /home/oracle/myadop.sh
source /home/oracle/credsEnv.sh
{ echo ${XX_APPS_PWD};echo ${XX_EBS_SYSTEM_PWD};echo ${XX_WEBLOGIC_PWD} ; } | adop "$@"
#now alert the terminal:
echo -e "\a"

Using this simple command I'm then able to run something like:

 ./myadop.sh phase=apply patches=36117775,36117775_D:u36117775.drv

This will result in a bell signal and a flashing putty taskbar logo as soon as the adop process completed.

Summary

Using this procedure I no longer have to check (eventually multiple) screen windows manually every few minutes if my patching completed - either successfully or in error. The procedure can obviously also be used for a lot of more long-running commands.

Patching E-Business Suite with more comfort - part 2 notifying with PuTTY

Automating Code Signing with latest E-Business Suite Signing Improvements - Part 4

Johannes Michler PROMATIS Horus Oracle


Executive Vice President – Head of Platforms & Development

Last week, Oracle released a major re-work of its article on Signing JAR Files for Oracle E-Business Suite Release 12 (Doc ID 1591073.1). Taking into consideration that all major public Code Signing CAs now require Hardware Security Module (HSM) based storage of the private key this was long awaited. In previous parts of this blog series I've covered how we can workaround the limitations of jarsigning in E-Business Suite, see part 1, part 2 and part 3.

In this 4th part we'll cover how this procedure can be improved by using these latest patches to E-Business Suite.

Installation of required patches

To take advantage of the new procedures you have to apply a couple of patches (see 1591073.1) for more details:

adop phase=prepare,apply,finalize,cutover,cleanup patches=36492441
adop phase=prepare,apply,actualize_all,finalize,cutover,cleanup patches=36407980,36505379,36555711,36499096 finalize_mode=full mtrestart=no cleanup_mode=full

Note: The Support note explicitly states that you have to apply 36492441 first, so it seems that this has to be done in 2 patching cycles.

Implementation of a customjarsign.sh for Certum

Without doing anything in addition applying those patches still signs the jars in KEYSTORE mode (the same way as before). However now you have the possibility to write your own/modified customarsign.sh script that calls more advanced signing commands. In my case I've changed that file to have the main custom signing method as follows:

signjar_custom () # $1 name of 1 JAR file
{
echo "INFO: Signing JAR '$1' with certum..."
zip -d ${jar} 'META-INF/*.SF' 'META-INF/*.RSA'
scp $1 certum@172.31.2.199:/tmp/signing-dummy.jar
retry_count=0
while true; do
ssh certum@172.31.2.199 "/home/certum/SS-9.1.11.0-dist/jre/bin/jarsigner -keystore NONE -tsa \"http://time.certum.pl\" -certchain /home/certum/mychain.pem -storetype PKCS11 -providerClass sun.security.pkcs11.SunPKCS11 -providerArg /home/certum/provider_simplysign.cfg -storepass 12345 /tmp/signing-dummy.jar 4F4F410D0356A9110B16AC9C73BD6F59" | tee -a ~/customsign.log
if [ ${PIPESTATUS[0]} -eq 0 ]; then
break
fi
if [ $retry_count -eq 0 ]; then
ssh certum@172.31.2.199 "echo \"Please start certum on Cloud Manager\" | mailx -s \"Please start and sign in to Certum for patching/signing!\" XX@promatis.de"
fi
retry_count=$((retry_count + 1))
echo `date`":in retry-loop for $1 , iteration $retry_count" >> ~/customsign.log
echo "signing failed; will try again in 5 seconds. Press q to abort"
read -t 5 -n 1 key
if [ "$key" = 'q' ]; then
echo "Loop aborted by user."
return 1
fi
JAR_EXISTS_FILE=/home/oracle/NO_JAR_SIGNING
if [ -f "$JAR_EXISTS_FILE" ]; then
echo "/home/oracle/NO_JAR_SIGNING exists. Exit with error" | tee -a ~/customsign.log
return 1
fi
done
scp certum@172.31.2.199:/tmp/signing-dummy.jar $1
echo "`date`signing of $1 succesful" >> ~/customsign.log
return 0
}

Now let us walk through this step by step:

  • first of all, this relies on the idea of part 3 of the blog series to copy the jar file to be signed (residing in $1) to the cloud manager VM on 172.31.2.199.
  • Before doing this, we remove any old signatures in the jar file - even though this may not always be necessary; it shouldn't harm either
  • Then we copy the jar to be signed to /tmp/signing-dummy.jar on the signing compute instance
  • after that we call the jarsigner over there through ssh
  • and finally if everything worked fine we copy the signed /tmp/singing-dummy.jar back to the original place and return as successful

As you have probably noticed there is some additional code though:

  • First of all logging is not working that nice when just handing out everything to stdout, so that's why I've decided to put everything relevant to ~/customsign.log
  • Furthermore, the process to sign using the Certum tools requires an up-to-date login/token. Since that may or may not be available I've decided to query for the signing result status and then go into a loop checking again every 5 seconds.

Since there is no real way to interact with the user through adjss / adadmin/adop I've decided to have the following workarounds:

  1. On the first fail of signing I write an E-Mail to myself asking myself to start the signing tool
  2. For testing purposes and when calling customsign.sh directly I allow to abort the endless loop by pressing "q"
  3. For PROD scenarios where I'm somehow unable to get a token and still want to continue the overall cycle (of course then without signing the jars) I check for a ~/NO_JAR_SIGNING file and if that exists I exit the script with an error.

Unit Testing the script

The support note describes an easy way to unit-test the script; keep in mind to do some testing both with the Certum tool started and not started. At the end you should have a result similar to:


successful test calling

Using the new CUSTOM method

Once unit testing is successful you have to copy the customjarsign.sh file to $APPL_TOP_NE/ad/admin/customjarsign.sh.

Afterwards you can change the signing mode to CUSTOM:

adjss -mode CUSTOM

Once that is done you can test in a more realistic way by calling:

adjss -sign

That should produce a result as follows:

Successful test using adjss

Keep in mind to also do some negative testing (stopped and only later on started SignTool) as well.

Re-Signing using adadmin

After all the tests were successful you can simply call adadmin (or apply a patch) which should call your customjarsign.sh script and sign modified .jar files "on the fly".

Summary

The new jar-sign-tooling released by Oracle makes Code Signing a lot more convenient again. Beside of using Certum there is an even more convenient "partial implementation" already provided in the script from Oracle that uses the digicert signing which should work entirely without user interaction. If you can spare the additional $$ it is probably easier to go for digicert instead of certum thus.

Patching E-Business Suite with more comfort - part 2 notifying with PuTTY

Patching E-Business Suite with more comfort - Part 1 Password Passing

Johannes Michler PROMATIS Horus Oracle


Executive Vice President – Head of Platforms & Development

Every quarter Oracle releases a bunch of Critical Patch Updates that have to be applied to (often many) E-Business Suite instances. While the patch application is highly automated through the adop utility, there are two (little) things that always annoyed me when patching:

  • You have to provide the apps, ebs_system and weblogic password on every adop command
  • You have to re-check your terminal connection to check if a certain step completed

This first part of this blog post series will cover how we can easily pass the passwords to adop; in the second part I will show how notifications can be brought to your attention quickly once the patching is completed.

Setting passwords to environment variables

First of all (regarding security): I assume that whoever is able to access the E-Business Suite apps tier does usually know the apps, weblogic and ebs_system password. Who made it that fare can do more harm anyway. But keep in mind: if you really permanently store that credsEnv.sh on your server that file will also be in backups or P2T copies. So you might want to set them only temporarily or go for the OCI Vault approach described further down!

I've created a small script credsEnv.sh as follows:

[oracle@prod122app01 ~]$ cat credsEnv.sh
export XX_APPS_PWD=apps
export XX_WEBLOGIC_PWD=Welcome1
export XX_EBS_SYSTEM_PWD=manager

Hopefully in the real world you have more fancy passwords, even though those passwords are not unseen 🙁

I'm using that script for fancy stop/start scripts that I'll describe in another blog post as well.

Of course you could also outsource storing of the passwords from this file to OCI Vault service (and secrets) that are described over there: https://docs.oracle.com/en-us/iaas/Content/KeyManagement/Tasks/managingsecrets_topic-To_create_a_new_secret.htm#createnewsecret

Then you could replace the above mentioned with something like:

export XX_APPS_PWD=$(oci secrets secret-bundle get --secret-id ocid1.vaultsecret.oc1.eu-frankfurt-1.12345 --query "data.\"secret-bundle-content\".content" --raw-output | base64 -d)

(where ocid1.vaultsecret.oc1.eu-frankfurt-1.12345 is the OCID of the secret storing the apps password)

Creating a custom myadop.sh script

Based on this I created a custom myadop.sh script as follows:

[oracle@prod122app01 ~]$ cat /home/oracle/myadop.sh
source /home/oracle/credsEnv.sh
{ echo ${XX_APPS_PWD};echo ${XX_EBS_SYSTEM_PWD};echo ${XX_WEBLOGIC_PWD} ; } | adop "$@"

Using this simple command I'm then able to run something like:

 ./myadop.sh phase=apply patches=36117775,36117775_D:u36117775.drv

This will result in something like:


Call to custom adop wrapper

Summary

While the procedure shown above is not "officially certified/documented" I made got experience with those commands; I'll also leverate them for "better" start/stop scripts for E-Business Suite that I'll show in a related blog post soon to be published.

Patching E-Business Suite with more comfort - part 2 notifying with PuTTY

Automating DNS Management for E-Business Suite on OCI

Johannes Michler PROMATIS Horus Oracle


Executive Vice President – Head of Platforms & Development

When automating operations of Oracle E-Business Suite using OCI and especially Oracle Cloud Manager – which is now even easier and faster with the latest release 22.1, as described in my previous blog post –, it is often necessary to modify DNS entries. For example, if you replace your testing instance with a new P2T copy you usually want to retain your database hostname (e.g. ebstestdb.intern.promatis.de), so that other systems can still reach the new P2T copy. Let’s see how we can achieve this:

DNS Private View

First of all, DNS Private Views, as I described over there, are very helpful. Using them, it is possible to define DNS entries within OCI. It is then possible to:

  • modify those entries using the OCI APIs, e.g. using the OCI CLI,
  • setup your regular DNS server to resolve some domains using the OCI DNS Server.

Modifying OCI DNS entries by API

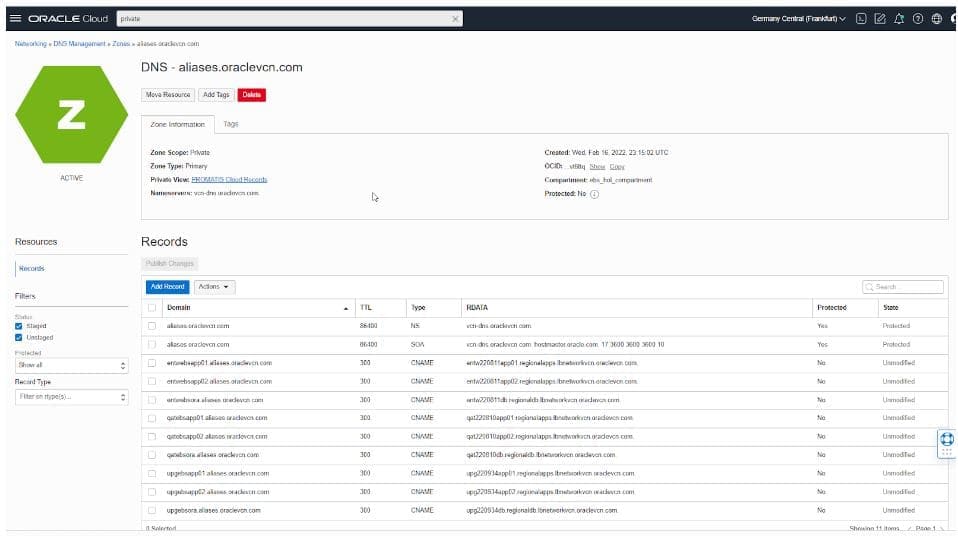
Modifying DNS entries using the OCI console is quite straightforward:

I prefer to have CNAME (=Aliases) over a "static" (within DNS) name, such as upgebsora.aliases.oraclevcn.com, to the actual current instance name that is maintained/created automatically through Cloud Manager (e.g. upg220934db.regionaldb.lbnetworkvcn.oraclevcn.com).

So how can we change this mapping (column RDATA) with the API? Just use a command as follows:

oci dns record domain update --domain upgebsora.aliases.oraclevcn.com --zone-name-or-id ocid1.dns-zone.oc1.eu-frankfurt-1.XXXX --items
"[{\"domain\":\"upgebsora.aliases.oraclevcn.com\",\"rdata\":\"${HOST_DB}.regionaldb.lbnetworkvcn.oraclevcn.com.\",\"rtype\":\"CNAME\",\"ttl\":300}]" --force

This command can be included in the cloning script and then updates the static database hostname to the newly created hostname (${HOST_DB}).

Delegating Windows Active Directory / DNS

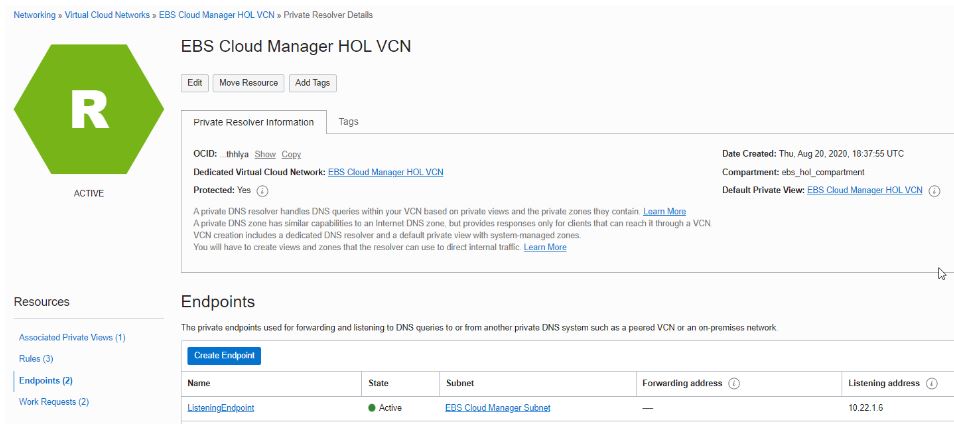
The above Private Views can be resolved anywhere within your OCI Virtual Cloud Network. Often, however, there is an additional DNS server in place managing the "Non-OCI" company-internal DNS entries. Without any special configuration, this DNS server is not able to resolve *.oraclevcn.com hostnames defined within the Virtual Cloud Network. To overcome this issues, first you have to create a (DNS) Listening Endpoint within the OCI network:


With that, you then have to create a new primary forward-lookup zone "oraclevcn.com":

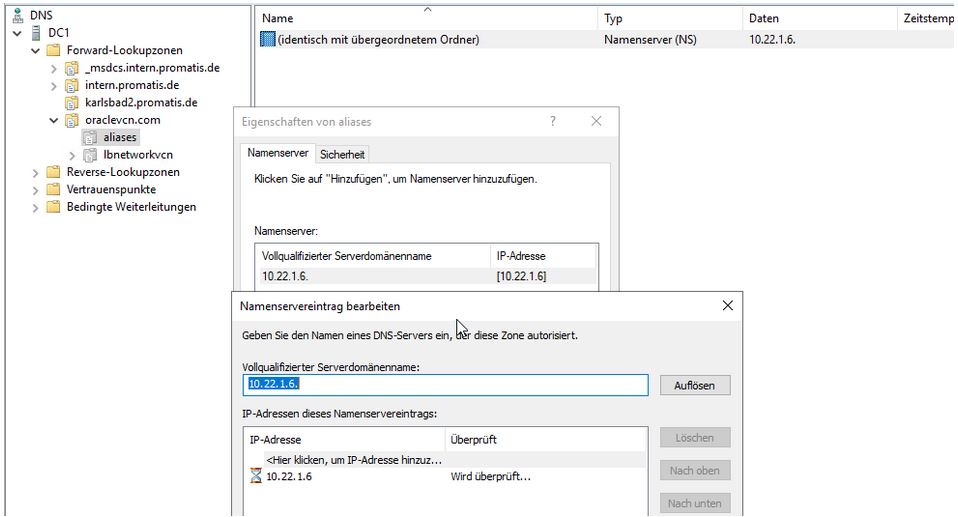
Within that new zone, create a new "delegation" for (in this case) both aliases.oraclevcn.com and lbnetworkvcn.oraclevcn.com:

At last, test the name resolution with your standard DNS server:

Summary

With DNS Private Views and a Listening Endpoint, you can configure your company DNS server to resolve OCI hostnames using the DNS functionalities of the OCI Virtual Cloud Network. Since those can be easily modified with OCI APIs, it is possible to fully automate changes to the DNS of E-Business Suite-related hostnames.

Patching E-Business Suite with more comfort - part 2 notifying with PuTTY

Initializing E-Business Suite Context for a Read-Only-User

Johannes Michler PROMATIS Horus Oracle


Executive Vice President – Head of Platforms & Development

Recently I described how a read-only user can be created for Oracle E-Business Suite.

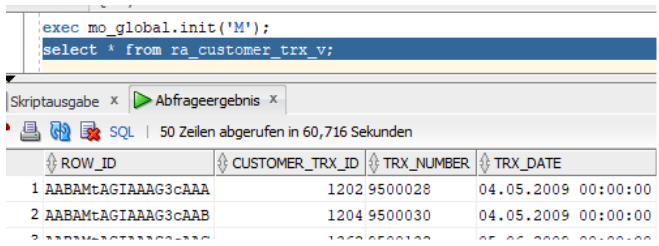
This works great, however, when trying to access the pre-built views of E-Business Suite, many of them do not show any data:

Let’s see how we can remedy this.

Initializing Context

When connected with the APPS user, this can be solved by running:
exec mo_global.init(‘M’);
This internally populates session-specific information on which operating units are accessible in a “M”ulti-Org.

Then, the above Statement returns all invoices as expected:

However, this query obviously can not run with the XXREAD user as created in the previous blog post, since we did not grant execute privileges to mo_global.

More grants

Let’s fix this:
exec AD_ZD.GRANT_PRIVS(‘EXECUTE’,’MO_GLOBAL’, ‘XXREAD’);

Unfortunately, this is not enough since the MO_GLOBAL package calls more procedures and is defined with AUTHID CURRENT_USER (see https://docs.oracle.com/en/database/oracle/oracle-database/19/dbseg/managing-security-for-definers-rights-and-invokers-rights.html).

There are basically two options to solve this problem:

  • You can create a “proxy package” with “AUTHID DEFINER” in the APPS schema, grant execute privs on that package to XXREAD and then call mo_global.ini from there. This approach can be used for other functions as well.
  • You need to grant the following privileges to XXREAD:
    exec AD_ZD.GRANT_PRIVS(‘EXECUTE’,’FND_GLOBAL’, ‘XXREAD’);
    exec AD_ZD.GRANT_PRIVS(‘ALL’,’MO_GLOB_ORG_ACCESS_TMP’, ‘XXREAD’);

Afterwards, the mo_global.init procedure can also be run as XXREAD.

Extending the Logon-Trigger

If you prefer to not run the mo_global.init function after each session-creation, you can extend the logon-trigger as follows:
create or replace TRIGGER xxread.xxread_query_logon_trg
AFTER logon ON XXREAD.SCHEMA
DECLARE
BEGIN
EXECUTE IMMEDIATE ‘ALTER SESSION SET CURRENT_SCHEMA =APPS’;
apps.mo_global.init(‘M’);
END;

Summary

By extending the XXREAD user created according to my previous blog post as described above, it is easily possible to access VPD-protected views and tables. It is thus even easier to replace (more dangerous) access as the APPS user with a less privileged user; in many scenarios where 3rd party systems are only reading the APPS user can be replaced with this XXREAD user without further modifications in the 3rd party systems.