21.-24.11.2023 | DOAG 2023 Konferenz + Ausstellung

21.-24.11.2023 | DOAG 2023 Konferenz + Ausstellung

4-fach geballte PROMATIS Power

Die DOAG 2023 Konferenz + Ausstellung findet vom 21. bis 24. November im Nürnberg Convention Center (NCC) statt und präsentiert erneut ein breitgefächertes Konferenzprogramm zu den neuesten Trends im Oracle-Umfeld. Rund 400 Vorträge sorgen für neue Impulse und Wissen pur – hochkarätige Keynotes, wertvolle Tipps & Tricks, Demos, Best Practices und moderne Networking-Elemente runden das Konferenz-Highlight der deutschsprachigen Oracle Community optimal ab.

Info

21. bis 24.11.2023
Nürnberg Convention Center (NCC)

Den Auftakt der viertägigen Anwenderkonferenz markiert am Dienstag ein Thementag, um tief in nur ein Thema einzutauchen. Am Mittwoch und Donnerstag können Sie sich auf zwei klassische Konferenztage mit Sessions in den vier Streams Datenbank & Infrastruktur, Development & Middleware, Strategie & Softskills und Data Analytics & KI freuen.

PROMATIS ist mit folgenden Beiträgen am Start:

  • OCI für Anfänger Teil 1 – Grundlagen (Thementag der DOAG Infrastructure & Middleware Community)
    Dienstag 21.11.2023 | 09:00 - 09:45 | Raum: Neu-Delhi
  • Oracle Database Service for Azure (Teil 2 Thementag)
    Dienstag, 21.11.2023 | 15:00 – 15:45 | Raum Neu-Delhi
  • PROMATIS goes digital – mit Oracle APEX im Gepäck
    Donnerstag 23.11.2023 | 11:00 - 11:45 | Raum: Istanbul
  • Von Druckerpresse zur Cloud – Hyperion Essbase Ablösung bei Saarbrücker Zeitung
    Donnerstag 23.11.2023 | 09:00 - 09:45 | Raum: Helsinki

Weitere Informationen zur DOAG 2023 Konferenz + Ausstellung finden Sie hier.

Automating DNS Management for E-Business Suite on OCI

Automating DNS Management for E-Business Suite on OCI

Johannes Michler PROMATIS Horus Oracle


Executive Vice President – Head of Platforms & Development

When automating operations of Oracle E-Business Suite using OCI and especially Oracle Cloud Manager – which is now even easier and faster with the latest release 22.1, as described in my previous blog post –, it is often necessary to modify DNS entries. For example, if you replace your testing instance with a new P2T copy you usually want to retain your database hostname (e.g. ebstestdb.intern.promatis.de), so that other systems can still reach the new P2T copy. Let’s see how we can achieve this:

DNS Private View

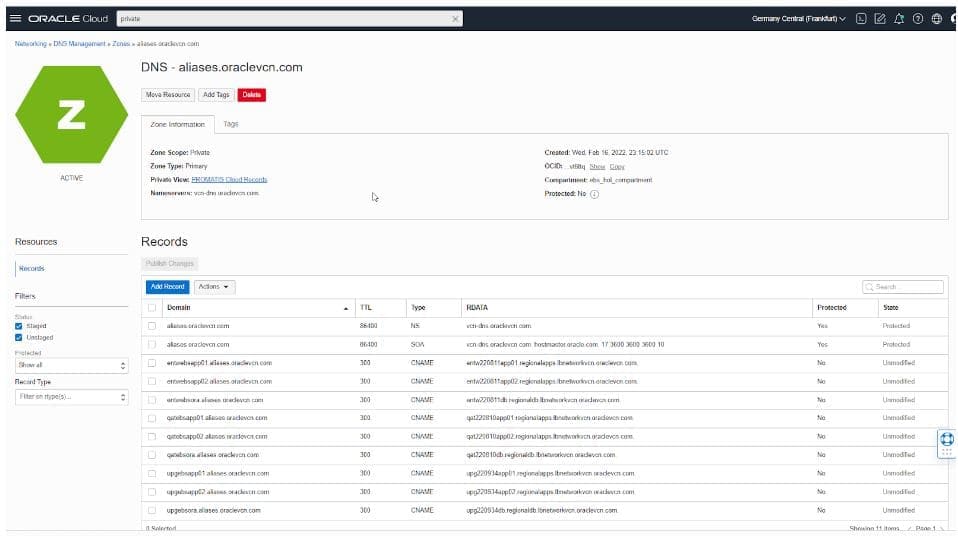
First of all, DNS Private Views, as I described over there, are very helpful. Using them, it is possible to define DNS entries within OCI. It is then possible to:

  • modify those entries using the OCI APIs, e.g. using the OCI CLI,
  • setup your regular DNS server to resolve some domains using the OCI DNS Server.

Modifying OCI DNS entries by API

Modifying DNS entries using the OCI console is quite straightforward:

I prefer to have CNAME (=Aliases) over a "static" (within DNS) name, such as upgebsora.aliases.oraclevcn.com, to the actual current instance name that is maintained/created automatically through Cloud Manager (e.g. upg220934db.regionaldb.lbnetworkvcn.oraclevcn.com).

So how can we change this mapping (column RDATA) with the API? Just use a command as follows:

oci dns record domain update --domain upgebsora.aliases.oraclevcn.com --zone-name-or-id ocid1.dns-zone.oc1.eu-frankfurt-1.XXXX --items
"[{\"domain\":\"upgebsora.aliases.oraclevcn.com\",\"rdata\":\"${HOST_DB}.regionaldb.lbnetworkvcn.oraclevcn.com.\",\"rtype\":\"CNAME\",\"ttl\":300}]" --force

This command can be included in the cloning script and then updates the static database hostname to the newly created hostname (${HOST_DB}).

Delegating Windows Active Directory / DNS

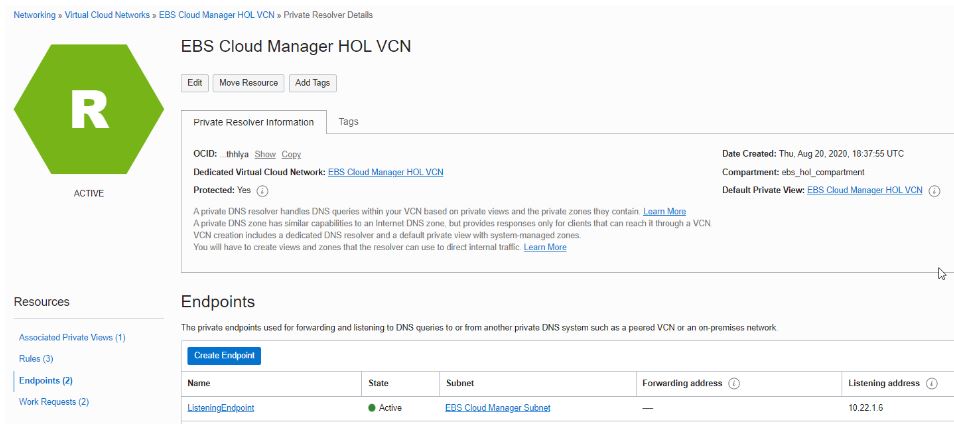
The above Private Views can be resolved anywhere within your OCI Virtual Cloud Network. Often, however, there is an additional DNS server in place managing the "Non-OCI" company-internal DNS entries. Without any special configuration, this DNS server is not able to resolve *.oraclevcn.com hostnames defined within the Virtual Cloud Network. To overcome this issues, first you have to create a (DNS) Listening Endpoint within the OCI network:

With that, you then have to create a new primary forward-lookup zone "oraclevcn.com":

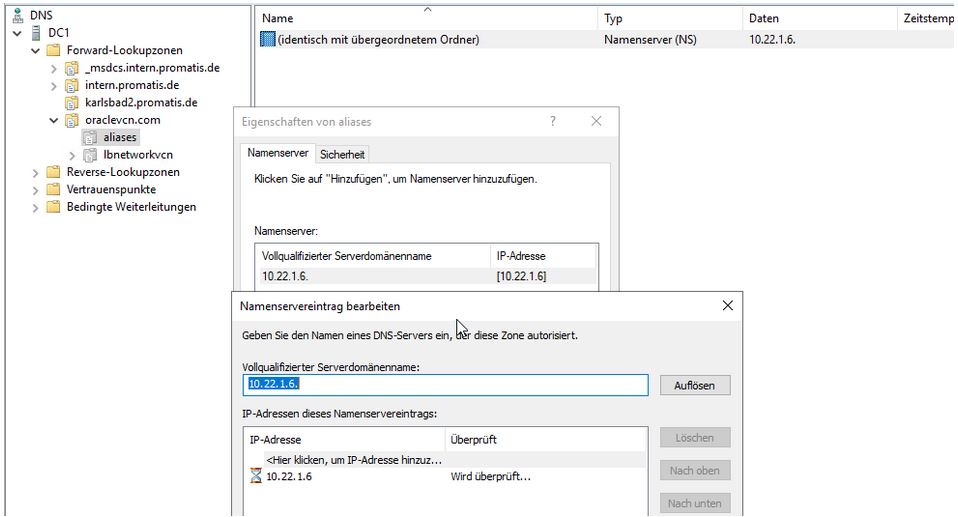
Within that new zone, create a new "delegation" for (in this case) both aliases.oraclevcn.com and lbnetworkvcn.oraclevcn.com:

At last, test the name resolution with your standard DNS server:

Summary

With DNS Private Views and a Listening Endpoint, you can configure your company DNS server to resolve OCI hostnames using the DNS functionalities of the OCI Virtual Cloud Network. Since those can be easily modified with OCI APIs, it is possible to fully automate changes to the DNS of E-Business Suite-related hostnames.

Automating DNS Management for E-Business Suite on OCI

Initializing E-Business Suite Context for a Read-Only-User

Johannes Michler PROMATIS Horus Oracle


Executive Vice President – Head of Platforms & Development

Recently I described how a read-only user can be created for Oracle E-Business Suite.

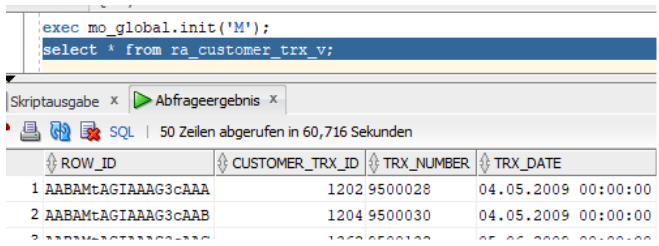
This works great, however, when trying to access the pre-built views of E-Business Suite, many of them do not show any data:

Let’s see how we can remedy this.

Initializing Context

When connected with the APPS user, this can be solved by running:
exec mo_global.init(‘M’);
This internally populates session-specific information on which operating units are accessible in a “M”ulti-Org.

Then, the above Statement returns all invoices as expected:

However, this query obviously can not run with the XXREAD user as created in the previous blog post, since we did not grant execute privileges to mo_global.

More grants

Let’s fix this:
exec AD_ZD.GRANT_PRIVS(‘EXECUTE’,’MO_GLOBAL’, ‘XXREAD’);

Unfortunately, this is not enough since the MO_GLOBAL package calls more procedures and is defined with AUTHID CURRENT_USER (see https://docs.oracle.com/en/database/oracle/oracle-database/19/dbseg/managing-security-for-definers-rights-and-invokers-rights.html).

There are basically two options to solve this problem:

  • You can create a “proxy package” with “AUTHID DEFINER” in the APPS schema, grant execute privs on that package to XXREAD and then call mo_global.ini from there. This approach can be used for other functions as well.
  • You need to grant the following privileges to XXREAD:
    exec AD_ZD.GRANT_PRIVS(‘EXECUTE’,’FND_GLOBAL’, ‘XXREAD’);
    exec AD_ZD.GRANT_PRIVS(‘ALL’,’MO_GLOB_ORG_ACCESS_TMP’, ‘XXREAD’);

Afterwards, the mo_global.init procedure can also be run as XXREAD.

Extending the Logon-Trigger

If you prefer to not run the mo_global.init function after each session-creation, you can extend the logon-trigger as follows:
create or replace TRIGGER xxread.xxread_query_logon_trg
AFTER logon ON XXREAD.SCHEMA
DECLARE
BEGIN
EXECUTE IMMEDIATE ‘ALTER SESSION SET CURRENT_SCHEMA =APPS’;
apps.mo_global.init(‘M’);
END;

Summary

By extending the XXREAD user created according to my previous blog post as described above, it is easily possible to access VPD-protected views and tables. It is thus even easier to replace (more dangerous) access as the APPS user with a less privileged user; in many scenarios where 3rd party systems are only reading the APPS user can be replaced with this XXREAD user without further modifications in the 3rd party systems.

Automating DNS Management for E-Business Suite on OCI

Creating a Read-Only APPS User

Johannes Michler PROMATIS Horus Oracle


Executive Vice President – Head of Platforms & Development

In Oracle E-Business Suite environments it is often necessary to query data. Typically, all data can be accessed through the APPS user. However, that user is highly privileged and, when in use, can easily “break things”. This is obviously a big compliance issue. Having a dedicated read-only user is thus a much better approach. Let’s see how such a “XXREAD”-user can be created.

Preparation

In order for the APPS user to be able to grant access to objects the user doesn’t actually own (e.g. tables in XX schemes), the APPS user needs to have privileges on those objects “including grant option”. This can be achieved with a script such as the following one, which should be run whenever new custom objects are created (as the XX scheme user):

set echo off;
set verify off;
BEGIN
FOR r IN (
SELECT
‘grant all on ‘
|| object_name
|| ‘ to apps with grant option’ statement_to_run
FROM
user_objects dbos
WHERE
(object_type IN ( ‘SEQUENCE’, ‘TABLE’ )
or object_type=’VIEW’ and object_name like ‘%#’)
AND NOT EXISTS (
SELECT
1
FROM
user_tab_privs privs
WHERE
privs.table_name = dbos.object_name
AND privs.type = dbos.object_type
AND privs.grantable = ‘YES’
AND privs.owner = user
)
order by object_type asc
) LOOP
EXECUTE IMMEDIATE r.statement_to_run;
END LOOP;
END;
/


Creating a user and granting privileges

First, create a XXREAD user and produce a script to grant privs:

. setenv_run.sh
sqlplus -s system/
create user XXREAD identified by MyAppsReadPwd;
grant create session to XXREAD;
grant alter session to XXREAD;
SET echo off
SET feedback off
SET term off
SET pagesize 0
SET linesize 200
SET newpage 0
SET space 0

spool grant_privs.sql
select ‘exec AD_ZD.GRANT_PRIVS(”READ”,”’||VIEW_NAME || ”’, ”XXREAD”);’ from all_views where OWNER =’APPS’ and view_NAME not like ‘%/%’;
select ‘exec AD_ZD.GRANT_PRIVS(”READ”,”’||table_NAME || ”’, ”XXREAD”);’ from all_tables where OWNER =’APPS’ and table_NAME not like ‘%/%’;
select ‘exec AD_ZD.GRANT_PRIVS(”READ”,”’||SYNONYM_NAME || ”’, ”XXREAD”);’ from all_synonyms syns, all_objects objs where
syns.OWNER =’APPS’ and syns.SYNONYM_NAME not like ‘%/%’
and syns.table_owner=objs.owner and syns.table_name=objs.object_name
and objs.object_type in (‘TABLE’,’VIEW’);
spool off
exit

Then, run the spooled script and register the XXREAD user:

sqlplus apps/ @grant_privs.sql
sqlplus apps/ @$AD_TOP/patch/115/sql/ADZDREG.sql apps XXREADsqlplus apps/ @/u01/install/APPS/fs1/EBSapps/appl/ad/12.0.0/sql/adutlrcmp.sql


First tests and logon trigger

After having initially created the user, sign in as XXREAD and do some initial testing by accessing apps.* tables.
Unfortunately, so far, it is still necessary to do all selects with an “apps.” prefix. This can be solved with two approaches:

  • Create a synonym in XXREAD for each APPS object.
  • Create a logon trigger that changes the CURRENT_SCHEMA.

Such a trigger can look as follows:

create or replace TRIGGER xxread.xxread_query_logon_trg
AFTER logon ON XXREAD.SCHEMA
DECLARE
BEGIN
EXECUTE IMMEDIATE ‘ALTER SESSION SET CURRENT_SCHEMA =APPS’;
END;
/


Summary

With the above procedure, it is possible to create a XXREAD user that can access (in a reading fashion) everything from the APPS user. This is a lot more secure than really using the APPS user/password since in that way, no one can accidentally run a “truncate” on some table. Also keep in mind, though, that such a XXREAD user is not the perfect solution and allows a lot of (reading) access, which still might be a GDPR issue; obviously, you also want to limit access to this XXREAD user as restrictive as possible.