Oracle Integration Cloud Hybrid integrations with Oracle Connectivity Agent

Overview
In integration projects, it is often needed to integrate cloud applications with on-prem systems running in the clients network. In most cases, the client network is not accessible from the internet. This situation makes the task of integrating this system for a cloud integration platform, such as the Oracle Integration Cloud (OIC), almost impossible.

Fortunately, the OIC comes with a functionality named Oracle Connectivity Agent (OCA). The small Java program that can be run as a service on a linux machine closes this gap. The OCA can currently work with the following OIC adapters as outbound (invoke) connection:
- DB2
- File
- FTP
- Microsoft SQL Server
- MySQL Database
- Oracle Database
- Oracle E-Business Suite
- REST
- SAP
- Siebel
- SOAP
- Kafka
- WebLogic JMS
- IBM MQ Series – JMS
As well as the following adapters as inbound (trigger) connection:
- DB2
- File
- JMS
- Microsoft SQL Server
- MySQL Database
- Oracle Database
- Oracle E-Business Suite
- SAP
- Siebel
- WebLogic JMS
- IBM MQ Series – JMS
(Some) Advantages of the OCA are:
- No ports need to be opened on the on-prem server,
- all connections between COA und OCI will be SSL secured,
- all communication is initiated from the OCA.
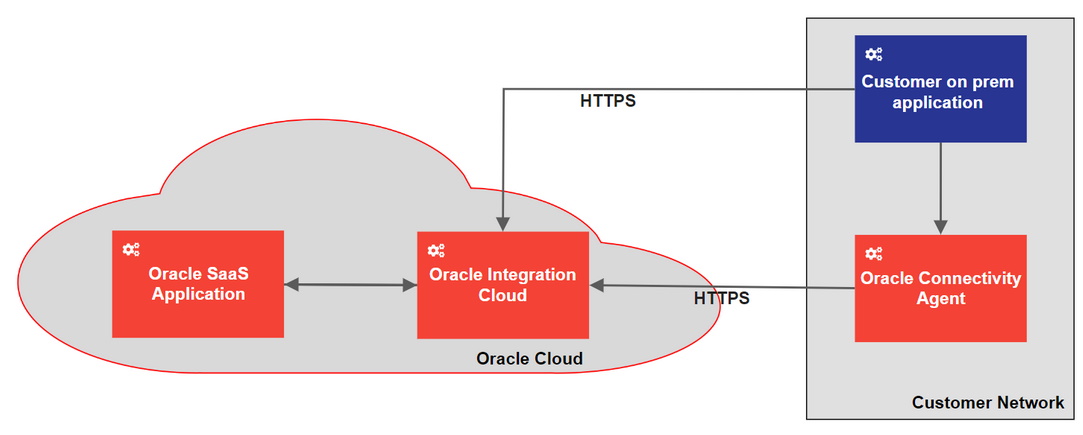
The basic pattern of how to use the OCA is the public internet pattern. In this pattern, the OAC will be installed in the customer network and communicate between the on-prem application and the OIC. The all connections will be via the public internet.

More information about the OCA can be found in the according Oracle Documentation (namely https://docs.oracle.com/en/cloud/paas/integration-cloud/agent.html) as well as in the related tutorial provided by Oracle (at https://docs.oracle.com/en/cloud/paas/integration-cloud/integrations-user/create-integration-exchange-messages-oracle-integration-and-local-host.html#GUID-F92564A0-8C6F-4C35-A5EE-B3F19571B616).
Installation
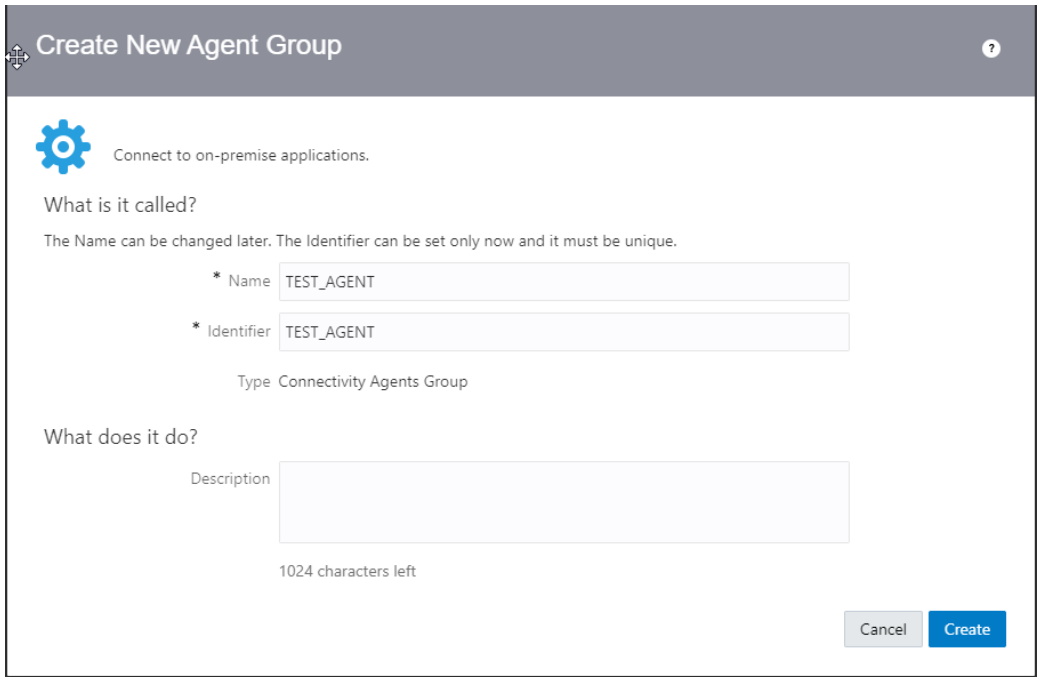
To create an OCA, you first need to login into the OIC, then navigate to „Integration“ – „Agents“ – „Create Agent Group“. The next step is to fill out the basic information for the OCA and save it.

After clicking “Create”, you should see the newly created agent in your agents list.

Next, download the agent ZIP file and copy it on the server, where the agent should run. Be aware that the agent cannot be run as a Windows service, so if you want to use the agent on a Windows server, the user must be logged in all the time. In the following, the explanation will apply to a Linux server.
After copying the files, unzip them into the folder where you want to store the data:
and modify the InstallerProfile.cfg
# oic_URL format should be https://hostname:sslPort
oic_URL=https://oic_host:ssl_port
agent_GROUP_IDENTIFIER=
#Proxy Parameters
proxy_HOST=
proxy_PORT=
proxy_USER=
proxy_PASSWORD=
proxy_NON_PROXY_HOSTS=
Check if JAVA_HOME is part of the PATH variable. If not, add it. After this, start the agent with:
If you want to run the connectivity agent as background service, you need to add
oic_USER=
oic_PASSWORD=
into the InstallerProfile.cfg and start it with
After this, the agent is running and can be used. In the integration cloud, you will see now that the agent is running.

Conclusion
Unfortunately (currently), it is not possible to define a virtual cloud network for the OIC to create a site-to-site connection between the Oracle Cloud and the customers network, so that the OIC connectivity agent is a good way to access on-premise systems that are not exposed to the internet. It is important to know the limitations of the adapters together with the agent. We suggest an installation of the connectivity agent on a Linux server.