Accessing EBS APIs from APEX - HR_SECURITY

Accessing EBS APIs from APEX - HR_SECURITY

Johannes Michler PROMATIS Horus Oracle


Executive Vice President – Head of Platforms & Development

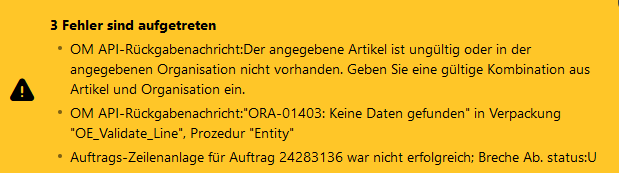
As you're probably aware, Oracle APEX is a great tool to extend Oracle E-Business Suite. When doing so recently for a customer where I wanted to provide a way to add lines to existing orders using the OE_ORDER_PUB API I ran into a very strange situation. While my own tests worked great, the business users were not able to use the extension and got quite obscure errors as follows:

The item specified is invalid or does not exist in the warehouse you specified. Please enter a valid item-warehouse combination.

The very same test case worked for my own user.

Let's have a look how we analyzed and finally solved that problem.

Overview on extending EBS with APEX

Oracle provides a comprehensive whitepaper on how to use APEX to extend E-Business Suite: Extending Oracle E-Business Suite Release 12.2 using Oracle APEX

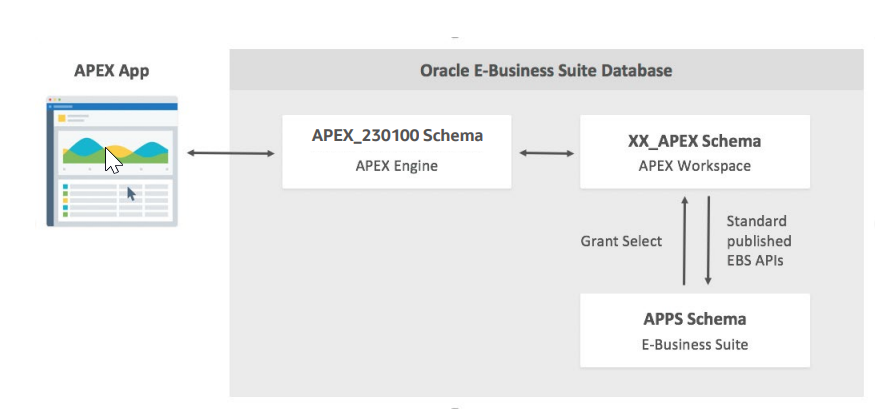
Recommended Database Configuration (as of mentioned Oracle Whitepaper)

The procedure suggests having a xx_apex_global package in the APPS schema that itself has an apps_initialize procedure that calls the E-Business Suite built-in function to initialize a session context for a given user, responsibility, and application.

Finding the cause of the API error

When calling OE_ORDER_PUB after doing such a context initialization for some users produced an error (OE_INVALID_ITEM_WHSE) as follows:

The item specified is invalid or does not exist in the warehouse you specified. Please enter a valid item-warehouse combination.

Analyzing this further gave, that there were no values in mtl_organizations - even though the context was properly initialized.

create or replace PROCEDURE APPS.xxis_mtl_param_test (p_user_id NUMBER)
AUTHID definer
AS
  l_tmp VARCHAR2(2000);
BEGIN
  dbms_output.put_line('starting; DB-User is:' || user);
  fnd_global.apps_initialize(p_user_id , 52203, 660);
  dbms_output.put_line('user is now: ' || fnd_global.user_id);


  SELECT
    LISTAGG(hao.organization_code, ';')
  INTO l_tmp
  FROM
    mtl_organizations hao;

  dbms_output.put_line('mtl_organizations: ' || l_tmp);
END;

To make things worse, the values that we got when calling xxis_mtl_param_test where different for the following situations:

  • when called in a SQL Developer session as the APPS database user initializing for a user IT_GUY, that is allowed to access all inventory organizations according to its security profile, everything is working fine.
  • when called in a APEX session, with both a real application or from the APEX Workbench (so technically as the APEX_PUBLIC_USER) initializing for a user IT_GUY, that is allowed to access all inventory organizations according to its security profile, everything is working fine.
  • when called in a SQL Developer session as the APPS database user initializing for a user BUSINESS_GUY, that is allowed to access only specific inventory organizations according to its security profile, everything is working fine. The list of accessible inventory organizations is filtered as expected:

    Accessing mtl_organizations as the Business User connected through APPS: Working
  • when called in a APEX session, with both a real application or from the APEX Workbench (so technically as the APEX_PUBLIC_USER) initializing for a user BUSINESS_GUY, that is allowed to access only specific inventory organizations according to its security profile, no records are shown up in mtl_organizations.

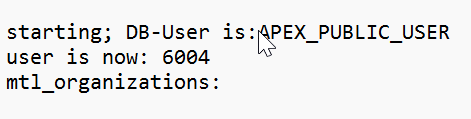
    Accessing mtl_organizations as the Business User connected through APEX_PUBLIC_USER: No accessible mtl_organizations

Debugging the code executed further brought up the HR_SECURITY package as the problematic part, since the mtl_parameters query contains a predicate as follows:

hr_security.show_record('HR_ALL_ORGANIZATION_UNITS',organization_id)='TRUE'

 Looking into the package I found the following code as the root cause:

 CURSOR csr_get_schema_mode
IS
SELECT DECODE(READ_ONLY_FLAG,'U', 'Y'
,'M', 'Y'
,'K', 'Y'
,'N') schema_mode,
DECODE(SUBSTRB(USERENV('CLIENT_INFO'), 1, 1),' ', NULL,
SUBSTRB(USERENV('CLIENT_INFO'),1, 10))
FROM FND_ORACLE_USERID
WHERE ORACLE_USERNAME = user;

That package obviously goes for the connecting user and classifies that into "real/good" users (such as the APPS user) and read-only-users (such as any custom schema - be it registered with adsplice or not.

Doing a quick hack of that decode (e.g. another decode for APEX_PUBLIC_USER to have schema_mode='Y') solved the above test case and made the OE_ORDER_PUB API call working as well.

Obviously, it is not a good idea to modify an Oracle seeded package. So, I checked (with the great help of Oracle Support) for a better solution.

Workaround for Bug 16914457

A temporary better workaround was to run the following statement:

exec fnd_oracle_user_pkg.load_row('APEX_PUBLIC_USER', 'CUSTOM', 'INVALID', 'Apex Schema Description', 'N', 'K');
commit;

That changed the APEX_PUBLIC_USER (through which ORDS connects for APEX applications in my case) to be classified as 'K' which had no negative side effects in our tests.

Summary

The above workaround allows accessing OE_ORDER_PUB and other APIs form apex without issues. I hope that there will be an official certification of the workaround through My Oracle Support soon.

Accessing EBS APIs from APEX - HR_SECURITY

Migrating E-Business Suite to File Storage Service

Johannes Michler PROMATIS Horus Oracle


Executive Vice President – Head of Platforms & Development

Recently, I described that starting with Release 22.2.1, the Oracle E-Business Suite Cloud Manager now supports OCI File Storage Service (FSS) besides block storage. Furthermore, the usage of FSS is mandatory for (new) multi-node environments: First Experience with E-Business Suite Cloud Manager 22.2.1

Given the advantages of FSS described in my previous blog one of my customers decided to migrate their apps-tier to File Storage Service. Let’s see how we did this:

Pre-Downtime

In preparation for the move first of all we had to create a new file system:

Creating the new file system.

This file system then has to be attached to a mount target and needs the proper export options:

NFS Export Options

Then, the mount point can be mounted in a temporary directory:

sudo mkdir /mnt/fss
sudo vi /etc/fstab
10.22.9.97:/ENTW220811 /mnt/fss nfs rw,bg,hard,timeo=600,nfsvers=3 0 0

Then:

sudo mount /mnt/fss
sudo chown oracle:oinstall /mnt/fss
sudo yum install -y fss-parallel-tools/

Downtime Operations

After these preparatory steps, we stop the entire environment and copy the content from the previous /u01 block volume over to the new FSS mount point /mnt/fss. Performance can be greatly improved by using fss-parallel-tools and parcp for this. For volumes of considerable size, an incremental operation can also be handy; but for the 300 GB one usually used for the apps-tier doing the migration in a 1-2 hours downtime is usually not a problem:

. setenv_run.s
adstpall.sh -mode=allnodes
~/stop_apex122.sh


sudo parcp --restore /u01/install /mnt/fss/


If working in a multi-node environment, then on the second apps-tier the mount through NFS to the primary apps-tier then needs to be replaced with a mount to the FSS mount target.

After the copy is finished, the old /u01/install mountpoint is retired and FSS is mounted to /u01:

sudo umount /u01
sudo vi /etc/fstab
10.22.9.97:/ENTW220811 /u01 nfs rw,bg,hard,timeo=600,nfsvers=3 0 0
sudo mount /u01

Then, start the apps-tier again:

. setenv_run.s
adstrtal.sh -mode=allnodes
~/start_apex122.shh

Post Downtime

After the downtime the old block volume should be detached through the OCI console. Furthermore, it is necessary to re-discover the environment in the E-Business Suite Cloud Manager. For this, either unregister the existing environment or (as I did in order to pick up the latest operating system image and add compatibility with the latest OCI shapes for the Cloud Manager) setup a new Cloud Manager environment. Make sure the Cloud Manager network profile is aware of the FSS Mount Target (usually, you have to create a new network profile for this).

Then, issue a re-discovery request:

Rediscovery of the moved environment

Setup FSS Snapshots

FSS is a highly durable service. However, that does not help against e.g. user errors (issuing “rm -rf /u01”). To remedy this, it is helpful to setup FSS Snapshots with e.g. an hourly snapshot (kept for a day) plus a daily snapshot (kept for a week). Unfortunately, so far this cannot be setup from the OCI console. Furthermore, for FSS it is currently not possible to perform automatic backups to OCI object storage (this is on the roadmap, though). However, using the utility fss-scheduler, such a backup policy can be easily setup.

Costs

As described in my previous post, FSS is considerably more expensive “per gigabyte” (see the oci price list) compared to block storage: 30 cents compared to just around 4.5 cents per GB and month. However due to the “sparse” nature of FSS, for an environment with production plus 3 clones for dev/test our storage usage changed from 4x400GB=1200GB with block storage (equaling roughly 54 USD/month) to 200GB + (3*15) GB = 245 GB (which equals 74 USD/month). The relative increase in costs may still seem significant, compared with the total costs for hosting 4 E-Business Suite environments with terabytes of block storage for the database; these are, however, peanuts. The ratio might even improve if in the future, Oracle will eventually use FSS clones for creating the patch file system (see, and vote for my idea over there).

Summary

By performing the above steps, you can migrate an E-Business Suite apps-tier easily to File Storage Service in a downtime of about 1 hour. By doing so, this it is e.g. possible to create very fast clones that are furthermore “sparse”.

Accessing EBS APIs from APEX - HR_SECURITY

Automating DNS Management for E-Business Suite on OCI

Johannes Michler PROMATIS Horus Oracle


Executive Vice President – Head of Platforms & Development

When automating operations of Oracle E-Business Suite using OCI and especially Oracle Cloud Manager – which is now even easier and faster with the latest release 22.1, as described in my previous blog post –, it is often necessary to modify DNS entries. For example, if you replace your testing instance with a new P2T copy you usually want to retain your database hostname (e.g. ebstestdb.intern.promatis.de), so that other systems can still reach the new P2T copy. Let’s see how we can achieve this:

DNS Private View

First of all, DNS Private Views, as I described over there, are very helpful. Using them, it is possible to define DNS entries within OCI. It is then possible to:

  • modify those entries using the OCI APIs, e.g. using the OCI CLI,
  • setup your regular DNS server to resolve some domains using the OCI DNS Server.

Modifying OCI DNS entries by API

Modifying DNS entries using the OCI console is quite straightforward:

I prefer to have CNAME (=Aliases) over a "static" (within DNS) name, such as upgebsora.aliases.oraclevcn.com, to the actual current instance name that is maintained/created automatically through Cloud Manager (e.g. upg220934db.regionaldb.lbnetworkvcn.oraclevcn.com).

So how can we change this mapping (column RDATA) with the API? Just use a command as follows:

oci dns record domain update --domain upgebsora.aliases.oraclevcn.com --zone-name-or-id ocid1.dns-zone.oc1.eu-frankfurt-1.XXXX --items
"[{\"domain\":\"upgebsora.aliases.oraclevcn.com\",\"rdata\":\"${HOST_DB}.regionaldb.lbnetworkvcn.oraclevcn.com.\",\"rtype\":\"CNAME\",\"ttl\":300}]" --force

This command can be included in the cloning script and then updates the static database hostname to the newly created hostname (${HOST_DB}).

Delegating Windows Active Directory / DNS

The above Private Views can be resolved anywhere within your OCI Virtual Cloud Network. Often, however, there is an additional DNS server in place managing the "Non-OCI" company-internal DNS entries. Without any special configuration, this DNS server is not able to resolve *.oraclevcn.com hostnames defined within the Virtual Cloud Network. To overcome this issues, first you have to create a (DNS) Listening Endpoint within the OCI network:

With that, you then have to create a new primary forward-lookup zone "oraclevcn.com":

Within that new zone, create a new "delegation" for (in this case) both aliases.oraclevcn.com and lbnetworkvcn.oraclevcn.com:

At last, test the name resolution with your standard DNS server:

Summary

With DNS Private Views and a Listening Endpoint, you can configure your company DNS server to resolve OCI hostnames using the DNS functionalities of the OCI Virtual Cloud Network. Since those can be easily modified with OCI APIs, it is possible to fully automate changes to the DNS of E-Business Suite-related hostnames.

Accessing EBS APIs from APEX - HR_SECURITY

First Experience with E-Business Suite Cloud Manager 22.2.1

Johannes Michler PROMATIS Horus Oracle


Executive Vice President – Head of Platforms & Development

Oracle recently released E-Business Suite Cloud Manager Release 22.2.1. There is an official blog post on the new features, but let’s have a look at my experience while migrating to this latest version for one of our customers.

New Features

Basically there are three areas of new features:

  1. Support for Oracle Cloud Infrastructure File Storage Service (FSS) as the shared application tier file system
  2. Cloning enhancement to allow change of database name for the clone
  3. Security enhancements

Let’s have a look at all of them:

Apps Tier on File Storage Service

In an environment with multiple application tiers (as it is common with e.g. external nodes or with larger, highly available environments) in a “shared filesystem” configuration previously data was residing on a block volume attached to the primary node. From there the /u01 directory was exported as an NFS share to the additional application server nodes. With the latest version of Cloud Manager it is possible to store the application server files of the E-Business Suite apps tier onto an OCI File System Storage Service (FSS). Oracle Cloud Infrastructure File Storage service provides a durable, scalable, secure, enterprise-grade network file system.

This has multiple advantages:

  • The service has much higher redundancy built in than traditional block storage. It furthermore provides more efficient snapshot capabilities.
  • Pricing is based on “storage volume used”, so you don’t need to pay for “spare” space as you would have to with traditional block volumes. With Cloning this get’s really relevant. As you can see in the following snapshot an entire E-Business Suite Apps Environment can come down to ~1 GB since only the delta to the source counts towards the storage volume:

  • There is no longer a “single point of failure” regarding the storage as it was with the previous approach.

However unfortunately there are also some drawbacks of this update:

  • The FSS is considerably more expensive than Block Storage. (0.30 $/GB over 0.0425$/GB per month with block storage); though this is way less massive than it seems due to the optimizations described above.
  • The old way is no longer available for new environments; the documentation states: “Oracle E-Business Suite Cloud Manager will continue to support preexisting environments which do not use FSS. However, we strongly recommend that you convert your environments to FSS. You can do so by first backing up the preexisting environment, and then provisioning a new environment from that backup using an FSS-enabled network profile. Alternatively, if you manually configured FSS in an Oracle E-Business Suite environment, you can now use the Oracle E-Business Suite Cloud Manager Discovery feature to register that environment.”

I’ll look into the exact procedure in a later blog post for sure.

Cloning allows changing of SID/PDB-Name

Basically there are two ways to create Production2Test copies using Cloud Manager:


Create a Backup, then provision that backup as a new environment

Pro’s:

  • robust
  • can change everything on the new environment
  • have a clean instance every time
  • verifies the backup (taking with RMAN) on clone

Con's:

  • Takes a lot of time with large databases (12-16 hours for 5 TB database; depending also on target instance size)

Use the Clone feature of Cloud Manager

Pro’s:

  • Very fast, leverages storage snapshot capabilities

Con's:

  • Previously unable to change SID/PDB Name
  • Uses a copy of the source OS; eventually have to quickly remove “prod” stuff such as mount points
  • Hostname of DB/Apps-Tier is unchanged

With the latest version of Cloud Manager one of the main drawbacks that forced me to use the “Backup and Restore” approach with many of my customers has gone away. Reason enough to give this a try.

Password issues while cloning

While trying out the new clone feature my first attempts were failing with some strange error of “Failed at Update Database context file vars”. With the help of Oracle Product Management we were able to find the reason for this by changing the ruby-cookbook (~/apps-unlimited-ebs/resources/chef-repo/cookbooks/oracle-ebs/recipes/computeclone-db-rename-config.rb) to not hide sensitve stuff (comment out the line):

Then upload the modified cookbook(s) using:
knife cookbook upload -a -V -o ~/apps-unlimited-ebs/resources/chef-repo/cookbooks

This gave us an error-message (still cryptic) and finally pointed us into the right direction. While creating the instance we had to choose the new sys/system password:

There is a note to have 2 special characters which must be _ # or -. However it better be not #. That is interpreted as a comment in the bash command and then leads to a fail. With a different password it is working.

I’ve created a bug with Oracle Development and I’m sure they’ll fix this, until then better go for _ or – as the special character and not put it at the beginning or the end of the password just to be sure.

Unfortunately that brought us right away to a second issue: Since we were already on AD/TXK Release 13 with the preparations for a system-less DBA we ran into a second bug: The tooling does change the system password of the target clone to the value specified in above screenshot; but it does NOT update the EBS_SYSTEM password. However, various autoconfig-related operations then try to connect to EBS_SYSTEM with the wrong password which obviously fails. The workaround in the end for now is to NOT change the SYS/SYSTEM/EBS_SYSTEM password as part of the cloning and eventually do this as a post-cloning operation.

Summary

E-Business Suite Cloud manager in the latest version is an even better way to manage your E-Business Suite environment in Oracle Cloud Infrastructure (OCI). With the latest cloning improvements it is finally possible to create a Production-To-Test Copy usable e.g. for error diagnostics within less than an hour (even with just a single OCPU as the target) and just minutes of effort:

Accessing EBS APIs from APEX - HR_SECURITY

Initializing E-Business Suite Context for a Read-Only-User

Johannes Michler PROMATIS Horus Oracle


Executive Vice President – Head of Platforms & Development

Recently I described how a read-only user can be created for Oracle E-Business Suite.

This works great, however, when trying to access the pre-built views of E-Business Suite, many of them do not show any data:

Let’s see how we can remedy this.

Initializing Context

When connected with the APPS user, this can be solved by running:
exec mo_global.init(‘M’);
This internally populates session-specific information on which operating units are accessible in a “M”ulti-Org.

Then, the above Statement returns all invoices as expected:

However, this query obviously can not run with the XXREAD user as created in the previous blog post, since we did not grant execute privileges to mo_global.

More grants

Let’s fix this:
exec AD_ZD.GRANT_PRIVS(‘EXECUTE’,’MO_GLOBAL’, ‘XXREAD’);

Unfortunately, this is not enough since the MO_GLOBAL package calls more procedures and is defined with AUTHID CURRENT_USER (see https://docs.oracle.com/en/database/oracle/oracle-database/19/dbseg/managing-security-for-definers-rights-and-invokers-rights.html).

There are basically two options to solve this problem:

  • You can create a “proxy package” with “AUTHID DEFINER” in the APPS schema, grant execute privs on that package to XXREAD and then call mo_global.ini from there. This approach can be used for other functions as well.
  • You need to grant the following privileges to XXREAD:
    exec AD_ZD.GRANT_PRIVS(‘EXECUTE’,’FND_GLOBAL’, ‘XXREAD’);
    exec AD_ZD.GRANT_PRIVS(‘ALL’,’MO_GLOB_ORG_ACCESS_TMP’, ‘XXREAD’);

Afterwards, the mo_global.init procedure can also be run as XXREAD.

Extending the Logon-Trigger

If you prefer to not run the mo_global.init function after each session-creation, you can extend the logon-trigger as follows:
create or replace TRIGGER xxread.xxread_query_logon_trg
AFTER logon ON XXREAD.SCHEMA
DECLARE
BEGIN
EXECUTE IMMEDIATE ‘ALTER SESSION SET CURRENT_SCHEMA =APPS’;
apps.mo_global.init(‘M’);
END;

Summary

By extending the XXREAD user created according to my previous blog post as described above, it is easily possible to access VPD-protected views and tables. It is thus even easier to replace (more dangerous) access as the APPS user with a less privileged user; in many scenarios where 3rd party systems are only reading the APPS user can be replaced with this XXREAD user without further modifications in the 3rd party systems.