Creating a Read-Only APPS User

Creating a Read-Only APPS User

Johannes Michler PROMATIS Horus Oracle


Executive Vice President – Head of Platforms & Development

In Oracle E-Business Suite environments it is often necessary to query data. Typically, all data can be accessed through the APPS user. However, that user is highly privileged and, when in use, can easily “break things”. This is obviously a big compliance issue. Having a dedicated read-only user is thus a much better approach. Let’s see how such a “XXREAD”-user can be created.

Preparation

In order for the APPS user to be able to grant access to objects the user doesn’t actually own (e.g. tables in XX schemes), the APPS user needs to have privileges on those objects “including grant option”. This can be achieved with a script such as the following one, which should be run whenever new custom objects are created (as the XX scheme user):

set echo off;
set verify off;
BEGIN
FOR r IN (
SELECT
‘grant all on ‘
|| object_name
|| ‘ to apps with grant option’ statement_to_run
FROM
user_objects dbos
WHERE
(object_type IN ( ‘SEQUENCE’, ‘TABLE’ )
or object_type=’VIEW’ and object_name like ‘%#’)
AND NOT EXISTS (
SELECT
1
FROM
user_tab_privs privs
WHERE
privs.table_name = dbos.object_name
AND privs.type = dbos.object_type
AND privs.grantable = ‘YES’
AND privs.owner = user
)
order by object_type asc
) LOOP
EXECUTE IMMEDIATE r.statement_to_run;
END LOOP;
END;
/


Creating a user and granting privileges

First, create a XXREAD user and produce a script to grant privs:

. setenv_run.sh
sqlplus -s system/
create user XXREAD identified by MyAppsReadPwd;
grant create session to XXREAD;
grant alter session to XXREAD;
SET echo off
SET feedback off
SET term off
SET pagesize 0
SET linesize 200
SET newpage 0
SET space 0

spool grant_privs.sql
select ‘exec AD_ZD.GRANT_PRIVS(”READ”,”’||VIEW_NAME || ”’, ”XXREAD”);’ from all_views where OWNER =’APPS’ and view_NAME not like ‘%/%’;
select ‘exec AD_ZD.GRANT_PRIVS(”READ”,”’||table_NAME || ”’, ”XXREAD”);’ from all_tables where OWNER =’APPS’ and table_NAME not like ‘%/%’;
select ‘exec AD_ZD.GRANT_PRIVS(”READ”,”’||SYNONYM_NAME || ”’, ”XXREAD”);’ from all_synonyms syns, all_objects objs where
syns.OWNER =’APPS’ and syns.SYNONYM_NAME not like ‘%/%’
and syns.table_owner=objs.owner and syns.table_name=objs.object_name
and objs.object_type in (‘TABLE’,’VIEW’);
spool off
exit

Then, run the spooled script and register the XXREAD user:

sqlplus apps/ @grant_privs.sql
sqlplus apps/ @$AD_TOP/patch/115/sql/ADZDREG.sql apps XXREADsqlplus apps/ @/u01/install/APPS/fs1/EBSapps/appl/ad/12.0.0/sql/adutlrcmp.sql


First tests and logon trigger

After having initially created the user, sign in as XXREAD and do some initial testing by accessing apps.* tables.
Unfortunately, so far, it is still necessary to do all selects with an “apps.” prefix. This can be solved with two approaches:

  • Create a synonym in XXREAD for each APPS object.
  • Create a logon trigger that changes the CURRENT_SCHEMA.

Such a trigger can look as follows:

create or replace TRIGGER xxread.xxread_query_logon_trg
AFTER logon ON XXREAD.SCHEMA
DECLARE
BEGIN
EXECUTE IMMEDIATE ‘ALTER SESSION SET CURRENT_SCHEMA =APPS’;
END;
/


Summary

With the above procedure, it is possible to create a XXREAD user that can access (in a reading fashion) everything from the APPS user. This is a lot more secure than really using the APPS user/password since in that way, no one can accidentally run a “truncate” on some table. Also keep in mind, though, that such a XXREAD user is not the perfect solution and allows a lot of (reading) access, which still might be a GDPR issue; obviously, you also want to limit access to this XXREAD user as restrictive as possible.

Oracle Fusion Cloud ERP Named a Leader for Fifth Straight Year in 2021 Gartner Magic Quadrant

Oracle placed furthest to the right for completeness of vision and highest for ability to execute compared to 9 other vendors

Oracle Fusion Cloud Enterprise Resource Planning (ERP) has been named a Leader in 2021 Gartner “Magic Quadrant for Cloud Core Financial Management Suites for Midsize, Large and Global Enterprises” for the fifth consecutive year. Of the 10 products evaluated, Oracle is placed highest for its ability to execute and is placed furthest to the right for completeness of vision.

Read the complete post here.

OCI I/O-Performance with E-Business Suite (Part 3/3) - LVM

OCI I/O-Performance with E-Business Suite (Part 3/3) - LVM

Johannes Michler PROMATIS Horus Oracle


Senior Vice President – Head of Platforms & Development

While moving a customer from On-Premises to Oracle Cloud Infrastructure, we recently conducted some performance testing before the final cutover. For the E-Business Suite database server, a physical box with 16 CPU cores was migrated to a VMStandard E3.Flex VM with 12 OCPU. From a CPU performance perspective, the new VM was much faster than the old box. Unfortunately, this was not the case on the I/O performance side. The first blog post (part 1) contains some general information about I/O performance in Oracle Cloud Infrastructure. In Part 2 I have covered how we can use ASM to overcome the limitations.

In this part we'll see how we can migrate an E-Business Suite on an OCI database instance to a LVM "RAID0" volume (striping) across a bunch of smaller disks.

Logical Volume Manager LVM

Wikipedia gives a good explanation on the purpose of Linux LVM:

In Linux, Logical Volume Manager (LVM) is a device mapper framework that provides logical volume management for the Linux kernel. LVM is used for the following purposes:

  • Creating single logical volumes of multiple physical volumes or entire hard disks (somewhat similar to RAID 0, but more similar to JBOD), allowing for dynamic volume resizing.
  • Managing large hard disk farms by allowing disks to be added and replaced without downtime or service disruption, in combination with hot swapping.
  • On small systems (like a desktop), instead of having to estimate at installation time how big a partition might need to be, LVM allows filesystems to be easily resized as needed.
  • Performing consistent backups by taking snapshots of the logical volumes.
  • Encrypting multiple physical partitions with one password.
    LVM can be considered as a thin software layer on top of the hard disks and partitions, which creates an abstraction of continuity and ease-of-use for managing hard drive replacement, repartitioning and backup.

For our purpose we are mainly interested in the first aspect of LVM.

Creating a new Logical Volume

Unfortunately, E-Business Suite instances provisioned through Oracle Cloud Manager (be it new installations or be it the restore of a backup) "on Compute" only use a single "Block Volume" to store all the data and the Oracle-Home of the Database (the whole structure beginning with /u01). Fortunately, this can be changed with the following sequence of steps outlined below:

1. In the Oracle Cloud Infrastructure Console create 9 new Block Volumes (lvm1-lvm9) with 500 GB each and attach them to the database compute instance.
2. Run the iscsi-attach commands shown in OCI console for each of the volumes (making them available in the linux vm).
3. Convert the LUNs into LVM physical volumes using:
pvcreate /dev/sdc /dev/sdd /dev/sde /dev/sdf /dev/sdg /dev/sdh /dev/sdi /dev/sdj /dev/sdk
4. Extend the volume group to use those disks:
vgextend ebs_vg /dev/sdc /dev/sdd /dev/sde /dev/sdf /dev/sdg /dev/sdh /dev/sdi /dev/sdj /dev/sdk
5. Create a new logical volume:
lvcreate -i9 -I4M -l100%FREE -n ebs_lv3 ebs_vg
Note: I have made good experience using a stripe size of 4 Megabyte, however this may depend on your payload and DB Block size.
6. Verify with lvdisplay -m that the new logical volume is available and appropriately striped.

Moving data to the new Volume

The easiest approach is to do an "offline" copy of all the data to the new logical volume. For this I did:

1. Stop everything and unmount /u01
2. Move everything to the new volume:
dd if=/dev/dm-0 of=/dev/dm-1 bs=128M status=progress oflag=direct iflag=direct
Double-check to take the appropriate source and target. If you want to resize to a smaller target in the same process you can also use filesystem copy (while preserving all links and permissions). The copy worked with appx. 600MByte/s so took a bit more than 2 hours for our database.
3. Change /etc/fstab to mount ebs_lv2 instead of ebs_lv and remount /u01
4. Bring the database up again.

It is also possible to do an online-migration using an approach as described here:

1. Instead of step (5) of the lvcreation do a lvconvert to create a raid1 between the existing LUN and the new LUNs:
lvconvert --type mirror -m 1 --mirrorlog core --stripes 8 /dev/ebs_vg/ebs_lv /dev/sdc /dev/sdd /dev/sde /dev/sdf /dev/sdg /dev/sdh /dev/sdi /dev/sdj
2. If this gives an error like "Number of extents requested (1165823) needs to be divisible by 8." first extend the logical volume by 1-7 extends to have something dividable.
3. Then break the mirror:
lvconvert -m0 /dev/ebs_vg/ebs_lv /dev/sdb
4. Reduce the VG by the old LUN:
vgreduce /dev/ebs_vg /dev/sdb
5. Remove the PV:
pvremove /dev/sdb
6. Detach the old 4.5TB Volume using the iscsi Commands, then using the OCI Cloud Console. Finally destroy the old/large volume.

Performance

Measuring Performance gives us an I/O-Performance that is by a factor of 7.7 (out of the theoretical maximum of 9) above the performance with a single drive. The throughput is a bit more than factor 3 higher than with a single drive:
Max IOPS = 178.571
Max MBPS = 1.409

This poor increase in throughput is due to the fact that we have hit the networking speed of our 12 OCPU VM: With "only" 12 GBps of network bandwidth we can reach no more than appx. 1400 MByte per second.

To check if this scales up even further with the added Network Bandwidth, change the number of OCPUs from 12 to 20, which gives us:

max_iops = 213.391 (theoretical max. by Storage: 225K)
max_mbps = 2.115 (theoretical max. by Storage 4.320; by Network 2.500 MByte/S)

This is again close to the physical limit of the network interface regarding the throughput, and as we see, the IOPS went a bit higher as well.

Overall, the performance was more or less the same compared to ASM. Note that for ASM I chose to use only 7 LUNs (since that was enough to contain all the data; then in addition, I had a LUN with 1 TB for the Oracle Home/...) while in the case with LVM everything went to the same logical volume requiring 9 LUNs (and thus providing an even better performance).

Summary

Using multiple Block Storage devices behind a single LVM logical volume with striping provides a convenient and reliable way to store the contents of an Oracle Database. In Oracle Cloud Infrastructure, more than a single block volume can easily be used to store the data. By striping of the data across multiple volumes, one can get a much better I/O performance than by using a single block volume, as provided by oracle "out of the box". For a database with multiple terabytes of storage, this provides a massive improvement in performance without additional OCI costs.

There are only two major drawbacks of this approach:

  • Unfortunately, so far, it is not possible to perform a fast-clone using E-Business Suite Cloud manager. There is an Enhancement Request planning to add support for a similar functionality.
  • Creating a backup and restoring this backup (e.g. for Cloning production to test) using Cloud Manager Tooling is possible. However, the target will also just have a single block volume. This leads to the testing environment being (slightly, hopefully this has only a performance impact) different from production.

To round up, I would recommend going for the LVM approach compared to ASM for the time being - especially if you do not use ASM for all of your "other" Oracle Databases in use.

The numbers are so excellent using this approach, that for now I do not give an "LVM Cache" on top of DenseIO instances with locally attached NVMe storage a try (as I had initially thought of). According to the documentation, this would at least not help much for an 8 OCPU instance much, given that DenseIO would then also "only" provide 250.000 IOPS. And it adds a lot of complexity and additional costs, especially since no "DenseIO E3 shape" is currently available.

OCI I/O-Performance with E-Business Suite (Part 3/3) - LVM

OCI I/O-Performance with E-Business Suite (Part 2/3)

Johannes Michler PROMATIS Horus Oracle


Senior Vice President – Head of Platforms & Development

While moving a customer from On-Premises to Oracle Cloud Infrastructure, we recently conducted some performance testing before the final cutover. For the E-Business Suite database server, a physical box with 16 CPU cores was migrated to a VMStandard E3.Flex VM with 12 OCPU. From a CPU performance perspective, the new VM was much faster than the old box. Unfortunately, this was not the case on the I/O performance side. The first blog post (part 1) contains some general information about I/O performance in the Oracle Cloud Infrastructure.

In this part we'll see how we can migrate an E-Business Suite on an OCI database instance to Automatic Storage Management (ASM) and what impact this has from a performance perspective.

Oracle Automatic Storage Management (ASM)

Oracle ASM is the Oracle recommended storage management solution that provides an alternative to conventional volume managers, file systems, and raw devices.

Oracle ASM is a volume manager and a file system for Oracle Database files that supports single instance configurations of Oracle databases and Oracle Real Application Clusters (Oracle RAC).

Oracle ASM uses disk groups to store data files. An Oracle ASM disk group is a collection of disks that Oracle ASM manages as a single unit. Within a disk group, Oracle ASM provides a file system interface for Oracle Database files. The contents of files stored in a disk group are evenly distributed to eliminate hotspots and to maintain uniform performance across the disks. The performance is comparable to the performance of raw devices. See the documentation for more details.

Installing ASM on an E-Business Suite instance provisioned through Cloud Manager

Unfortunately, E-Business Suite instances deployed through Oracle Cloud Manager (whether for new installations or when restoring a backup) "on Compute" do not leverage ASM for storing Database content. Fortunately, this can be changed with the following sequence of steps outlined below:

  1. In the Oracle Cloud Infrastructure Console create 7 new Block Volumes (asm1-asm7) with 500 GB each and attach them to the database compute instance.
  2. Execute the iscsi-attach commands displayed in OCI console for each of the volumes (and make them available in the linux vm).
  3. Configure asmlib
    yum install oracleasm-support kmod-oracleasm
    groupadd -g 54327 asmdba
    groupadd -g 54328 asmoper
    groupadd -g 54329 asmadmin
    useradd -u 54331 -g oinstall -G dba,asmdba,asmoper,asmadmin grid
    oracleasm configure -I (accept defaults)
    oracleasm init
    oracleasm createdisk DATA1 /dev/sdc1
    oracleasm createdisk DATA2 /dev/sdd1
    oracleasm createdisk DATA3 /dev/sde1
    oracleasm createdisk DATA4 /dev/sdf1
    oracleasm createdisk DATA5 /dev/sdg1
    oracleasm createdisk DATA6 /dev/sdh1
    oracleasm createdisk DATA7 /dev/sdi1
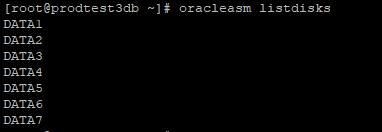
  4. Verify using oracleasm listdisks that 7 Disks are now managed by asm:
  5. Make sure to modify the system.d unit for oracleasm to startup only after iscsid has been loaded.
  6. Give appropriate file-limits to the "grid" user and grant it access to ORACLE_BASE:
    chmod g+w /u01/install/APPS/admin/
  7. Install the Clusterware as the "grid" user using runInstaller
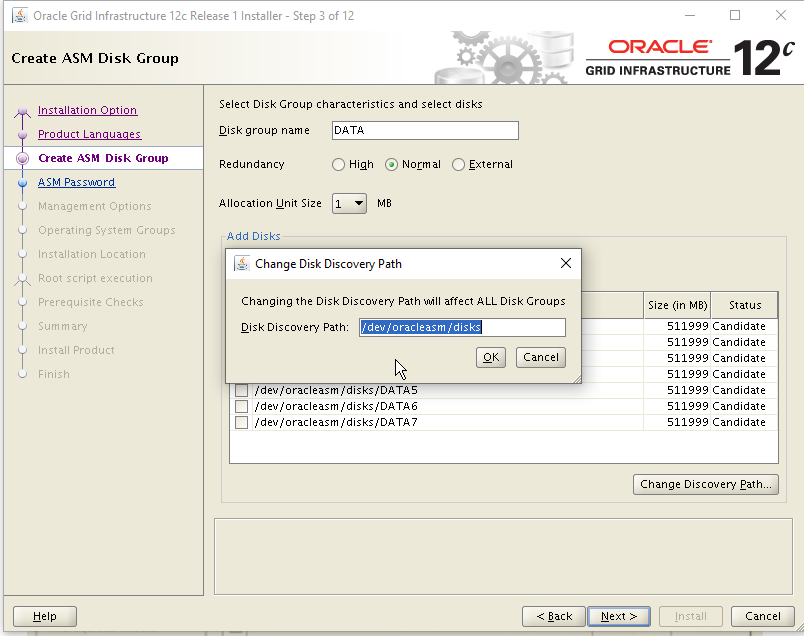
  8. Create a datagroup +DATA out of the 7 disks created. Use "external redundancy" since data is already redundant on the OCI Block Storage level.
  9. Patch Clusterware to the latest DBBP.
  10. Verify using asmcmd that the +DATA disk group is working as expected.


Moving data to ASM

After the installation of Clusterware and configuration of an ASM diskgroup +DATA, all data that was previously on a local EXT3 partition must be moved to ASM. The steps to be performed are well explained in the oracle documentation. On a high level:

  1. Create an spfile backup
  2. Use RMAN to create a "BACKUP as COPY" to ASM
  3. Shut down the database
  4. Bring it up while configuring control-file and db_create_file_dest to +DATA
  5. Restore the control files to ASM
  6. Switch database to copy using RMAN
  7. Recover and Open the database
  8. Replace temporary tablespace files and redo logs with new files on ASM

Performance

The Measuring Performance gives us an I/O-Performance, which is by factor 6.5 (from the theoretical maximum of 7) higher than the performance with a single drive. The throughput is slightly more than factor 3 higher than with a single drive:

Max IOPS = 161.620

Max MBPS = 1.412

This worse than expected increase in throughput is due to the fact that we have hit the networking speed of our 12 OCPU VM: With "only" 12 GBps of network bandwidth we can reach no more than appx. 1400 MByte per second.

Summary

Using ASM provides a convenient and reliable way to store the contents of an Oracle Database. In the Oracle Cloud Infrastructure, this allows using more than a single block volume to store data easily.

By automatically distributing data across multiple volumes, you can achieve much better I/O performance than using a single block volume as provided by Oracle "out of the box". For a database with several terabytes of storage, this means a massive performance improvement without additional OCI costs.

There are only three major drawbacks of this approach:

  • Unfortunately, it is not yet possible to perform a fast-clone using E-Business Suite Cloud manager. It is also unlikely to be "on the roadmap", as Oracle would suggest using the Database Cloud Service (BYOL) as backend for the E-Business Suite in such cases.
  • Clusterware installation containing ASM is something that needs to be maintained in addition to the database home. Furthermore, "traditional DBAs" tend to prefer "dbf-files" over ASM.
  • It is possible to create a backup and restore this backup (e.g. for the cloning production to be tested) with Cloud Manager tools. However, the target will not have ASM as a storage option. As a result, the test environment will differ from the production environment.

In the third part of this series we will see how the Linux Volume Manager can serve as a lightweight alternative to ASM.