June 8 – 11, 2025 | ASCEND 2025

June 8 – 11, 2025 | ASCEND 2025

PROMATIS @ ASCEND 2025

Join us at Ascend, the premier Oracle user community event that brings together functional users, IT professionals, and experts for valuable discussions and hands-on learning.
PROMATIS at ASCEND 2025

Join PROMATIS for two presentations where we’ll share our expertise to help you optimize your Oracle journey and drive success.

Our speaker Johannes Michler is a Senior Principal Consultant at PROMATIS with more than 15 years of experience in the reengineering of business processes, the use of innovative digitization technologies, application development, system administration and the conception of complex technical information system solutions. A proven expert in the design and implementation of integration and functional extensions for Oracle’s enterprise applications. He has also been awarded at the highest level within the “Oracle ACE Program”.

  • Session 1: How moving EBS from AWS to OCI halves costs & doubles performance for your licenses
    Date: Monday, June 9, 2025 | 11:15 AM – 12:15 PM
    Room: Suwannee 14 (Level 2)
    In this session, Johannes will provide real-world performance and price comparisons between Oracle Cloud Infrastructure (OCI) and AWS infrastructure for running E-Business Suite (EBS). You’ll also gain insights into the technology licensing implications across major cloud providers (AWS, OCI, and Azure), as well as discover additional benefits – beyond performance and costs – of running EBS on OCI.
  • Session 2: APEX for E-Business Suite 2025 edition: AI and SSO
    Date: Tuesday, June 10, 2025 | 10:15 AM - 11:15 AM
    Room: Gatlin E-1 (Level 1)
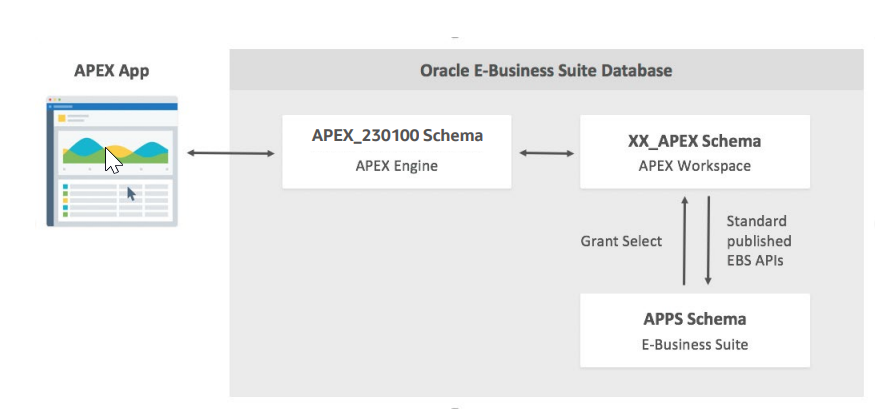
    In this session, you’ll explore how Oracle APEX can be used to build powerful user interfaces for your E-Business Suite (EBS) customizations, with a focus on AI-driven solutions. You’ll also find out how to seamlessly integrate APEX as a native EBS extension, without the need for custom SSO solutions, while avoiding common pitfalls around SSO and API calls.

Don’t miss out on this opportunity and gain practical insights to elevate your Oracle experience. Find more information here.

Build a Secure Oracle APEX App with Microsoft Azure AD Login and Delegated Calendar Access

Build a Secure Oracle APEX App with Microsoft Azure AD Login and Delegated Calendar Access

Johannes Michler PROMATIS Horus Oracle


Executive Vice President – Head of Platforms & Development

Build a Secure Oracle APEX App with Microsoft Azure AD Login and Delegated Calendar Access

In today’s enterprise landscape, apps that integrate with Microsoft 365 are in high demand – especially when it comes to calendar data. This data can be accessed through the Microsoft Graph API.

But too often, developers over-permission their apps, requesting access to all calendars in a Microsoft 365 tenant. That’s risky, unnecessary, and avoidable.

In this article, I’ll walk you through building an Oracle APEX application that:

  • Supports Microsoft Azure AD social sign-in
  • Uses delegated Microsoft Graph API permissions to access only the signed-in user's calendar
  • Respects the principle of least privilege

Let’s get started.

Why Delegated Permissions Matter

When integrating with Microsoft Graph, there are two permission types: delegated and application.

  • Delegated: Your app acts on behalf of a signed-in user and only accesses what the user has access to.
  • Application: Your app acts on its own and can access data across the entire tenant.

We’ll be using delegated permissions so users explicitly consent to sharing their data – and your app won't have unrestricted access to the org’s calendars.

Register the App in Azure AD

First, create an Enterprise Application in Azure:

  1. Go to Azure Portal > Azure Active Directory > App registrations
  2. Click New registration
  3. Name your app and set the Redirect URI to your APEX instance: https://<your_apex_domain>/ords/apex_authentication.callback

After registration:

  • Save the Application (client) ID and Directory (tenant) ID
  • Go to API permissions > Add a permission > Microsoft Graph
  • Select Delegated permissions, then add: Calendars.Read

This gives your app permission to read a user’s personal calendar — but only after they sign in and consent.

Build a Secure Oracle APEX App with Microsoft Azure AD Login and Delegated Calendar Access
Configuration of the Application in Azure Portal

Create a set of client credentials and note down:

  • "Directory (tenant) ID"
  • "Secret Value" (not: the Secret ID; we don't need that at all)
  • "Application (client) ID"

Set Up OAuth2 in Oracle APEX

In APEX first of all you have to create Credentials for your newly created OAuth App. For this navigate to Workspace Utilities > Web Credentials >Create. The credentials have to be of type "Basic credentials" with the "Client ID" as the username and the "Secret Value" as the password.

Oracle APEX supports OAuth2 natively through social sign-in. Here's how to configure it:

  1. Go to Shared Components > Authentication Schemes
  2. Create a New Scheme > Social Sign-In
  3. Set the Credential Store to the Credential store created previously.
  4. Set Authentication Provider to OpenID Connect Provider
  5. Fill in: Discovery URL: https://login.microsoftonline.com/<TENANT_ID>/.well-known/openid-configuration
  6. For the Scope it should be enough to just have openid
  7. In my case I want to have the login/e-mail as the username; best select #upn# to achieve this.
  8. Finally make sure to enter a post authentication procedure. In my case this is "post_authentication_fct"

Build a Secure Oracle APEX App with Microsoft Azure AD Login and Delegated Calendar Access
Newly setup Authentication Scheme

Enable this scheme and make it the default for your app.

Now, users can log in using their Microsoft 365 credentials, and APEX will manage token storage behind the scenes.

Preserve the REFRESH_TOKEN

After login a Refresh-Token is available within the Post-Login-Procedure. We save that away into an Application Item "REFRESH_TOKEN" as follows:

procedure post_authentication_fct
as
l_token varchar2(4000);
begin
-- set token for REST call
l_token := trim(apex_json.get_clob('refresh_token')) ;
apex_util.set_session_state('REFRESH_TOKEN', l_token);
end post_authentication_fct;

For this you have to create the following application items:

  • REFRESH_TOKEN
  • ACCESS_TOKEN

We can then create an access token based on this application item whenever we need it as follows.

Note: The access_token that I can get in the post_authentication_fct didn't work for unclear reasons for me. But with the REFRESH_TOKEN I was able to proceed:

procedure set_oauth_token
as
l_access_token varchar2(4000);
l_access_token_parsed apex_jwt.t_token;
l_refresh_token varchar2(4000);
rest_p apex_application_global.vc_arr2;
rest_v apex_application_global.vc_arr2;
v_response CLOB;
begin
l_access_token := apex_util.get_session_state('ACCESS_TOKEN');
if l_access_token is not null then
l_access_token_parsed := apex_jwt.decode (
p_value => l_access_token );
begin
apex_jwt.validate (
p_token => l_access_token_parsed,
p_aud => 'https://graph.microsoft.com',
p_iss => 'https://sts.windows.net/<TENANT_ID>/',
p_leeway_seconds => 120);
APEX_WEB_SERVICE.OAUTH_SET_TOKEN(l_access_token);
return;
exception when VALUE_ERROR then
null; -- we try to get a new one later
end;
end if;

l_refresh_token := apex_util.get_session_state('REFRESH_TOKEN');
--Note: You probably want to get ClientID/Secret from the APEX Credentials:
rest_p(1) := 'client_id';
rest_v(1) := '<CLIENT_ID>';
rest_p(2) := 'client_secret';
rest_v(2) := '<CLIENT_SECRET>';
rest_p(3) := 'grant_type';
rest_v(3) := 'refresh_token';
rest_p(4) := 'scope';
rest_v(4) := 'https://graph.microsoft.com/.default';
rest_p(5) := 'refresh_token';
rest_v(5) := l_refresh_token;
v_response := apex_web_service.make_rest_request(
p_url => 'https://login.microsoftonline.com/<TENANT ID>/oauth2/v2.0/token',
p_http_method => 'POST',
p_parm_name => rest_p,
p_parm_value => rest_v
);
SELECT
JSON_VALUE(v_response, '$.access_token')
INTO l_access_token
FROM
dual;
l_access_token_parsed := apex_jwt.decode (
p_value => l_access_token );
apex_jwt.validate (
p_token => l_access_token_parsed,
p_aud => 'https://graph.microsoft.com',
p_iss => 'https://sts.windows.net/<TENANT_ID>/',
p_leeway_seconds => 120);
APEX_WEB_SERVICE.OAUTH_SET_TOKEN(l_access_token);
apex_util.set_session_state('ACCESS_TOKEN', l_access_token); 
end set_oauth_token;

You can/should call this procedure before every actual call to the API. The actual call can then be:

declare
l_response clob;
begin
set_oauth_token;
l_response := apex_web_service.make_rest_request(
p_url => 'https://graph.microsoft.com/v1.0/me/calendars',
p_http_method => 'GET',
p_scheme => 'OAUTH_CLIENT_CRED',
);
-- Use APEX_JSON to parse and display events
end;

This call returns the signed-in user’s accessible calendars using their token — no tenant-wide access required. You can get the actual calendar Events with something similar like:

'https://graph.microsoft.com/v1.0/me/calendars/'||p_calendar_id||'/calendarview?startdatetime='||l_start_period || '&enddatetime='||l_end_period;

Want to show a calendar in your app? Parse the JSON response using APEX_JSON and feed it into a Calendar region, Interactive Report, or even a Kanban view.

Wrapping Up

Let’s recap what we built:

  • An Oracle APEX app with Microsoft social sign-in
  • Delegated permission access to Microsoft 365 calendars
  • A secure, least-privilege integration via Microsoft Graph API

This approach offers the best of both worlds: enterprise-grade integration with zero overreach into your organization’s data.

What’s Next?

You can extend this further by:

  • Integrating /me/mailFolders for Outlook emails
  • Showing availability with /me/calendarView
  • Combining calendar data with APEX dashboards or mobile apps

If you’re building internal tools, client portals, or productivity dashboards, this is a powerful – and secure – pattern to adopt.

Extending E-Business Suite Natural Language Query (NLQ) to Support Custom Data Models

Extending E-Business Suite Natural Language Query (NLQ) to Support Custom Data Models

Johannes Michler PROMATIS Horus Oracle


Executive Vice President – Head of Platforms & Development

Extending E-Business Suite Natural Language Query to Support Custom Data Models

Oracle E-Business Suite (EBS) provides powerful Natural Language Query (NLQ) capabilities that allow users to interact with data using conversational language (see EBS Natural Language Query – Ask your E-Business Suite anything with AI). This functionality is robust for querying standard EBS tables in the following pre-defined domains:

  • Discrete Costing
  • Discrete Manufacturing
  • Dispute (AR)
  • Logistics (Inventory)
  • Maintenance
  • Order Management (OM)
  • Payment (AP)
  • People (HR)
  • Process Manufacturing (GME)
  • Project Manufacturing (PJM)

However, organizations often have custom data models that require similar access. Extending the NLQ framework to support custom data models enhances user experience and improves efficiency in retrieving relevant insights. Let's have a look how (surprisingly easy) this can be achieved based on a custom contract management solution we've implemented for one of our PROMATIS customers.

Revisiting the architecture

As shown in my previous blog posts the overall architecture of the E-Business Suite NLQ Feature looks as follows:

Extending E-Business Suite Natural Language Query to Support Custom Data Models
Architecture of E-Business Suite NLQ (see 3059877.1)

If we want to add an additional domain, e.g. from a custom contract management system we have to perform 3 high level steps:

  1. Provide one or multiple tables or (materialized) views in the EBS APPS Schema that contains relevant data
  2. Make the views/tables accessible to the XX_NLQ schema in a Read-Only fashion
  3. Replicate the data model as "empty tables" in the XX_NLQ_UTIL of the ADB
  4. Create a new AI Profile in the Autonomous Database
  5. Manage accessibility in EBS

Providing base data

First, you should evaluate which data to make available to the Natural Language Query model. I had good experiences with de-normalized data e.g. containing all contract data. You can provide this base data e.g. as a database view. If there are tons of data and the view has to access a complex and large base data model that may contain not so much relevant data, it might be helpful to create a dedicated materialized view that is e.g. refreshed on an hourly basis and that contains all relevant data in a quickly accessible manner.

Keep in mind that the Select AI approach shown here heavily relies on the names of tables and their columns: Remember to name things (especially columns) so that they can be understood through the Large Language Model (LLM).

After having identified the relevant tables/views/MVs for a domain create synonym and grant READ access to the XX_NLQ schema within EBS:

create synonym XX_NLQ.XX_CONTRACTS_V for APPS.XX_CONTRACTS_V;
exec AD_ZD.grant_privs('READ', ‘XX_CONTRACTS_V', 'XX_NLQ');

Verify that you can access the data e.g. by using the Oracle APEX "SQL Workshop".

Replicate data model in Autonomous Database

The next and very important step is to replicate the data model (but just the model, so without any data) within the Autonomous Database 23ai running in OCI. For this you might run:

create table XX_CONTRACTS_V (
CONTRACT_NUMBER NUMBER,
CONTRACT_STATUS VARCHAR2 (30),
CUSTOMER_NAME VARCHAR2(400),
CUSTOMER_NUMBER NUMBER,
CUSTOMER_CITY VARCHAR2(400),
CONTRACT_VOLUME NUMBER,
CREATION_DATE DATE,
...

If your data in E-Business Suite resides in a table, you can just copy the DDL from e.g. Oracle SQL Developer. If it is a view you might want to do "create table xx_test as select * from XX_CONTRACTS_V where rownum<5;" and then use that xx_test table to get the DDL.

Especially for columns containing a limited number of values it may be very beneficial to add a table comment, e.g. as follows:

comment on table XX_CONTRACTS_V is "This table contains information on customer contracts in the area of XYZ.";

comment on XX_CONTRACTS_V .CONTRACT_STATUS is "The column describes the contract status. Possible values are DRAFT for not yet signed contracts, ACTIVE for currently active contracts and TERMINATED for historic contracts.";

Creating an additional AI profile in ADB

After having made the metadata available in the Autonomous Database 23ai on OCI we have to create a new AI Profile for the newly created domain. This is straightforward:

Insert into FND_NLQ_DOMAIN_PROFILE_MAP (DOMAIN_NAME,BUSINESS_TERMS,PROFILE_NAME,PROFILE_PROMPT) values
('CONTRACTS','Contracts, Verträge, Kundenverträge','EBS_NLQ_CONTRACTS_PROFILE', NULL);

Insert into FND_NLQ_DOMAIN_TABLE_MAP (DOMAIN_NAME,OWNER,TABLE_NAME) values ('CONTRACTS','XX_NLQ_UTIL','XX_CONTRACTS_V');

Then run the nlq_util_ai_profiles.sql script provided from oracle again which will create a new SQL AI profile. Then check if the profile got created in USER_CLOUD_AI_PROFILES.

Manage accessibility in E-Business Suite

Create an additional Forms Function "EBS_NLQ_CONTRACTS_PROFILE":

Extending E-Business Suite Natural Language Query to Support Custom Data Models
New Forms Function for custom Contracts table

Then add the newly created function / permission to the permission sets of your choice. After compiling security this should bring the new domain into the Ask E-Business Suite UI:

Extending E-Business Suite Natural Language Query to Support Custom Data Models
New Contracts Domain available

Some words on security

The above-mentioned approach just controls overall access to the new domain. It is crucial that you consider row level access to the data you plan to expose to your users. For this have a look at the seeded functions defined in nlq_datasec_functions.sql and create an appropriate filter for your use cases (XX_CONTRACTS_V in my example): You definitely don't want to expose the salary of your CEO to everyone 😉 You can then assign a security function as follows:

DBMS_RLS.ADD_POLICY (
object_schema => 'APPS',
object_name => 'XX_CONTRACTS_V',
policy_name => 'XX_CONTRACTS_VPD',
function_schema => 'APPS',
policy_function => 'XX_CONTRACTS_FUNC1',
statement_types => 'select'
);

Summary

The E-Business Suite Natural Language Query feature is not just powerful "out-of-the-box". As described in this blog post it is quite easy to extend the functionality for your custom data models. In various PROMATIS projects we've seen that this gives impressive insights at very low efforts.

Extending E-Business Suite Natural Language Query (NLQ) to Support Custom Data Models

Running E-Business Suite "Select AI" (NLQ) on-premises

Johannes Michler PROMATIS Horus Oracle


Executive Vice President – Head of Platforms & Development

To setup an internal demo environment for PROMATIS, I recently ran into the problem, that I didn't have an Autonomous Transaction Processing / 23ai database at hand (available and reachable with a VPN). Instead of setting up a VPN (or going for public internet traffic) and an ATP in OCI I decided (for the sake of trying it) to build something on-premises that serves as the system where DBMS Select AI does its magic. Let's have a look.

Notice: Do not try this at home for real workloads. This is probably not a supported scenario.

Architecture of E-Business Suite Natural Language Query (NLQ) feature

In case you missed my previous blog post on the EBS NLQ feature you might want to have a look here.

Basically, here is the overall architecture again:

High level architecture of the solution; source: Oracle, see 3059877.1

The blog post here handles the "ADB on OCI" part in the top, where the metadata schema is handed over to the OCI (or OpenAI or other) Large Language Model. Usually that is running in a 23ai database on OCI; but for this blog post I replaced it with a simple docker container.

    Starting an on-premises Autonomous Transaction Processing DB

    The official Oracle Container Registry (which is always my first point to look for Oracle docker images - there are great containers from Gerald Venzl at https://github.com/gvenzl/oci-oracle-free as well though) reveals a "Oracle Autonomous Database Free" database here: https://container-registry.oracle.com/ords/ocr/ba/database/adb-free

    From a license perspective the container states: "The container image you have selected and all of the software that it contains is licensed under the Oracle Free Use Terms and Conditions which is provided in the container image. Your use of the container is subject to the terms of Oracle Free Use Terms and Conditions license.". This should be good enough for some internal testing. 🙂

    So, let's get the database up and running which is - if you already have a docker engine running and a reasonable fast internet connection a matter of 5-10 minutes and of just a single command:

    docker run -d \
    -p 1521:1521 \
    -p 8443:8443 \
    -e WORKLOAD_TYPE='ATP' \
    -e WALLET_PASSWORD=FancyPwd2025forNLQ \
    -e ADMIN_PASSWORD=FancyPwd2025forNLQ \
    -e ENABLE_ARCHIVE_LOG=False \
    --cap-add SYS_ADMIN \
    --device /dev/fuse \
    --name adb-nlq-ebs01 \
    container-registry.oracle.com/database/adb-free:latest-23ai

    After a few minutes you should be able to access apex under https://localhost:8443.

    Internal/ADMIN/FancyPwd2025forNLQ should work to sign in to both APEX as well as SQL Developer web.

    Special considerations during the NLQ for EBS setup

    Large parts of the setup work in the usual way as greatly described in MOS Note 3059877.1.

    Here are the "special things" I had to consider. Note: I am still using OCI and the LLama (in this case 3.3) model to run the interference. Should you be very sensitive regarding data privacy you might replace the backend with some local Llama model. Or you could go for the OpenAI GPT-4o model instead as well. The supported providers are:

    • OpenAI
    • Cohere
    • Azure
    • OCI
    • Google
    • Anthropic
    • Hugging Face

    So here are the special things to consider when running the ATP in a docker container:

    • When using Meta Llama as the LLM (by the way I was using LLama 3.3-70b for this test) you eventually must adjust the nlq_util_ai_profiles.sql. I'll do some more testing comparing version 3.1 and 3.3 of the model in a later blog post. The modification itself is simple though:
    l_llm_model VARCHAR2(100) := 'meta.llama-3.3-70b-instruct';
    • The authentication with OCI cannot use the usual resource principals. To overcome this, I've created a regular user and an API key. Put that user into an appropriate group and grant the group (instead of the instance principal) permission to use Generative AI services.
    • Then as the XX_NLQ_UTIL user of the (local) ATP create a credential using DBMS_CLOUD as follows (all in one line):
    exec DBMS_CLOUD.CREATE_CREDENTIAL(credential_name => 'adb_nlq_ebs01',user_ocid =>'ocid1.user.oc1..userid',tenancy_ocid =>'ocid1.tenancy.oc1..tenandid',private_key => 'allInOneLinePrivateKey',fingerprint => '12:34:56...');
    • Finally, again in the nlq_util_ai_profiles exchange the llm credentials:
     l_llm_cred VARCHAR2(30) := 'adb_nlq_ebs01';

    Testing OCI LLM Access

    To verify if everything is working in the ATP I used the following commands:

    begin
    DBMS_CLOUD_AI.DROP_PROFILE(
    profile_name => 'TESTGENAI'
    );
    commit;
    end;
    /
    
    BEGIN
    DBMS_CLOUD_AI.CREATE_PROFILE(
    profile_name => 'TESTGENAI',
    attributes => '{"provider": "oci",
    "credential_name": "adb_nlq_ebs01",
    "object_list": [{"owner": "XX_NLQ_UTIL", "name": "DUAL"}],
    "model": "meta.llama-3.3-70b-instruct",
    "temperature":"0.4",
    "oci_apiformat": "GENERIC",
    "region": "eu-frankfurt-1",
    "oci_compartment_id":"ocid1.compartment.oc1..12345"
    }'
    );
    commit;
    END;
    /
    
    SELECT DBMS_CLOUD_AI.GENERATE(prompt => 'What is Oracle DB',
    profile_name => 'TESTGENAI',
    action => 'chat')
    FROM DUAL;

    This should give you something as follows:


    Test accessing DBMS_CLOUD_AI with the LLM running in OCI

    Further setup

    The remaining setup was "as usual" and without any problems. Keep in mind that it will probably be necessary to set the application setting "ADB_HTTPS_HOST" to the name of your container host - since this is the CN that ords uses for the self-signed certificate.

    Summary

    The above procedure allows to quickly set up the EBS for NLQ feature with a local Autonomous Transaction Processing database running in a docker container on-premises. In the real world obviously I'd discourage of doing this and using a (supported) Oracle ATP instance in OCI instead. And hopefully, your E-Business Suite instance is running in OCI as well anyways. 😉

    Extending E-Business Suite Natural Language Query (NLQ) to Support Custom Data Models

    Solving issues with new E-Business Suite APEX integration for existing users

    Johannes Michler PROMATIS Horus Oracle


    Executive Vice President – Head of Platforms & Development

    In November 2024 Oracle released a new and greatly improved version of the E-Business Suite to Oracle APEX extension. When implementing this for 2 of our PROMATIS customers that had already an older solution for this I ran into issues when running an adop cycle after running the ADAPEXSCHREG.sql.

    Here is how we were able to overcome this:

    Issues with adop patch cycle

    The Problem we ran into was, that ADAPEXSCHREG "forcibly" updates the fnd_oracle_userid to have the password of the APEX Schema/user as INVALID. This may be a good idea in general, however if you have previously adspliced the APEX schema within E-Business Suite (which may be a good idea for various reason), this will break a follow-up adop cycle. When adop validates to connect to the application that has now an "INVALID" password it fails; thus breaking the ADOP cycle.

    As shown in this blog post I've been able to solve this by restoring the entry in fnd_oracle_userid from a backup; however you'll probably prefer to not even run into this situation.

      De-Register the custom application

      Fortunately it is easy to de-register the custom application. This process is described in 2085355.1 and basically all you have to do is the following:

      cd $AD_TOP/bin/
      perl adDeregisterCustomProd.pl


      De-Registering the application

      For at least one customer environment I had to run the process twice; once with an APP-CAPPS Application name and once with the all-lower version.

      Validate

      After de-registering I checked the fnd_oracle_userid (the record should no longer be anabled) and fnd_application table (the record should be vanished:


      Record gone from fnd_application


      You should then run an "adop -validate" and finally an (empty) patching cycle.

      Only then did I run ADAPEXSCHREG.sql which did then not cause any further issues. I hope Oracle will extend the ADAPEXSCHREG script to do some validations in that area.

      Summary

      With the above procedure it is possible to use a pre-existing APEX parsing schema with the new 12.2 APEX for EBS extension.