In said post, we got hold of a "OAuth Bearer Token" that is needed to call those APIs in a very manual way "through the browser". In real life, this does not really come in handy. This blog post will describe how a bearer token (including a refresh token) can be received through the command line.
Preparations
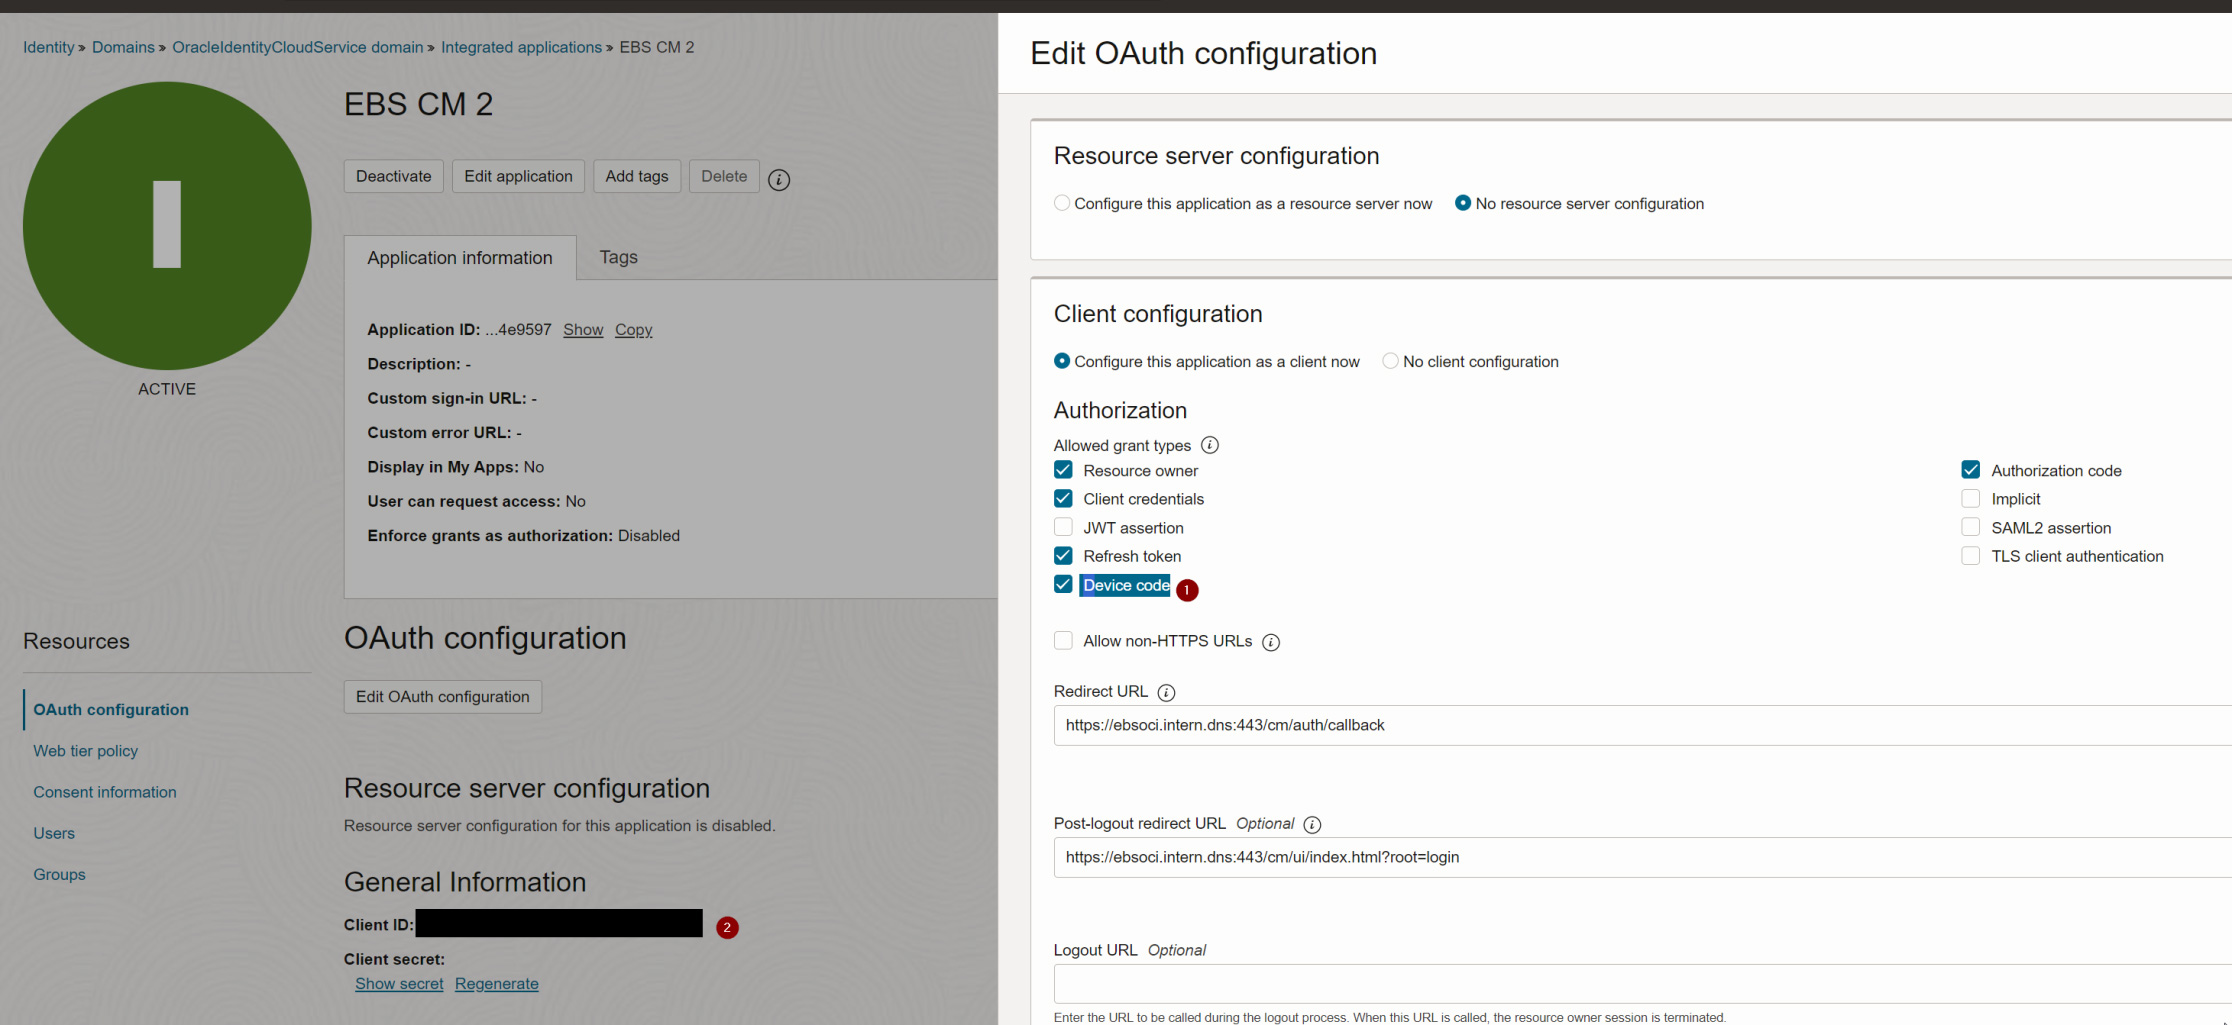
In preparation for using the scripts shown below, we have to enable the usage of "Device Codes" for the Cloud Manager application in IDCS:

Definition of Cloud Manager application in IDCS
Furthermore you should take note of the client_id, the client_secret and the IDCS url. All 3 have also been used during Cloud Manager setup.
A piece of Code
First of all, the following shell script does all the magic needed. You have to replace XXXXX, YYYYY and ZZZZZ with values from your environment:
#!/bin/sh
CLIENT_ID="XXXXX" # as in IDCS
CLIENT_SECRET="YYYYY" # as in IDCS
CLOUDMGR_URL=https://ebsoci.intern.dns
IDCS_BASE_URL=https://idcs-ZZZZZ.identity.oraclecloud.com/oauth2/v1
IDCS_TOKEN_URL=${IDCS_BASE_URL}/token
IDCS_DEVICE_URL=${IDCS_BASE_URL}/device

PASS_ENC=`echo -n "$CLIENT_ID:$CLIENT_SECRET" | base64 -w 0`

#echo PASS_ENC $PASS_ENC

if [ -f "mytoken" ]; then
REFRESH_TOKEN=`cat mytoken | jq '.refresh_token'| tr -d '"'`
echo refresh token: $REFRESH_TOKEN
BEARER_TOKEN=`curl -K -i -H 'Authorization: Basic '"$PASS_ENC"'' -H 'Content-Type: application/x-www-form-urlencoded;charset=UTF-8' --request POST $IDCS_TOKEN_URL -d 'grant_type=refresh_token&refresh_token='"$REFRESH_TOKEN"`
cp mytoken mytoken.old
else
DEVICE_INFO=`curl -K -i -H 'Authorization: Basic '"$PASS_ENC"'' -H 'Content-Type: application/x-www-form-urlencoded;charset=UTF-8' --request POST $IDCS_DEVICE_URL -d 'response_type=device_code&scope=urn:opc:idm:t.user.me%20offline_access&client_id='"$CLIENT_ID"`
echo $DEVICE_INFO
DEVICE_CODE=`echo $DEVICE_INFO | jq '.device_code'|tr -d '"'`
echo identified DEVICE_CODE $DEVICE_CODE press enter when done
read HAS_FINISHED
BEARER_TOKEN=`curl -K -i -H 'Authorization: Basic '"$PASS_ENC"'' -H 'Content-Type: application/x-www-form-urlencoded;charset=UTF-8' --request POST $IDCS_TOKEN_URL -d 'grant_type=urn:ietf:params:oauth:grant-type:device_code&device_code='"$DEVICE_CODE"`
fi

echo $BEARER_TOKEN
echo $BEARER_TOKEN > mytoken
ACCESS_TOKEN=`echo $BEARER_TOKEN| jq '.access_token'| tr -d '"'`
echo ACCESS_TOKEN: $ACCESS_TOKEN

# call the rest api to get shapes
#

curl -k -X GET $CLOUDMGR_URL/ebs/shapes/networkProfile/MY_AD2 -H 'Authorization: Bearer '"$ACCESS_TOKEN"''
First running the script
When you call this script for the first time, it gives an output as follows:
{"device_code":"xxxxxx","user_code":"CTHJNLAM","verification_uri":"https://idcs-ZZZZZ.identity.oraclecloud.com:443/ui/v1/device","expires_in":300}
identified DEVICE_CODE 483150ce7704487da495593d1c97c2a4 press enter when done
Just open the verification URI provided in a browser, sign in to IDCS and pass the user_code CTHJNLAM.
Then, return to the shell script and press return. This will allow the script to get a Bearer Token including a Refresh token.
Subsequent runs
On every subsequent run, the "previous" refresh token (stored in the file mytoken) is exchanged for an access token and a new refresh token. That new refresh token is saved (each refresh token is a one-time-use token) and can then be used for the next run.
Using the access token we received through that way, we can conveniently access the Cloud Manager APIs.
Summary
With the above way, you can get a token that is valid for at least a week. For most operations this should be sufficient; if not, these timings can be extended in IDCS. See https://docs.oracle.com/en/cloud/paas/identity-cloud/rest-api/TokenExpiryTable.html for more details on that (OAuth Refresh Token Expiry).
The combination of the procedure described in this and the previous blog post allow a simple and complete end-to-end automation of clones - e.g. on a nightly basis.

