Exposing NULL values and Booleans in JSON/REST with Oracle SOA Suite

Exposing NULL values and Booleans in JSON/REST with Oracle SOA Suite

Johannes Michler PROMATIS Horus Oracle


Executive Vice President – Head of Platforms & Development

Recently we had a couple of projects where we needed to expose data extracted from an Oracle Database through a simple SQL query as a REST service producing JSON. Let’s have a look at how it is possible to control the JSON produced in such a scenario.

Implementation

The composite is very, very trivial:


Composite in SOA Suite

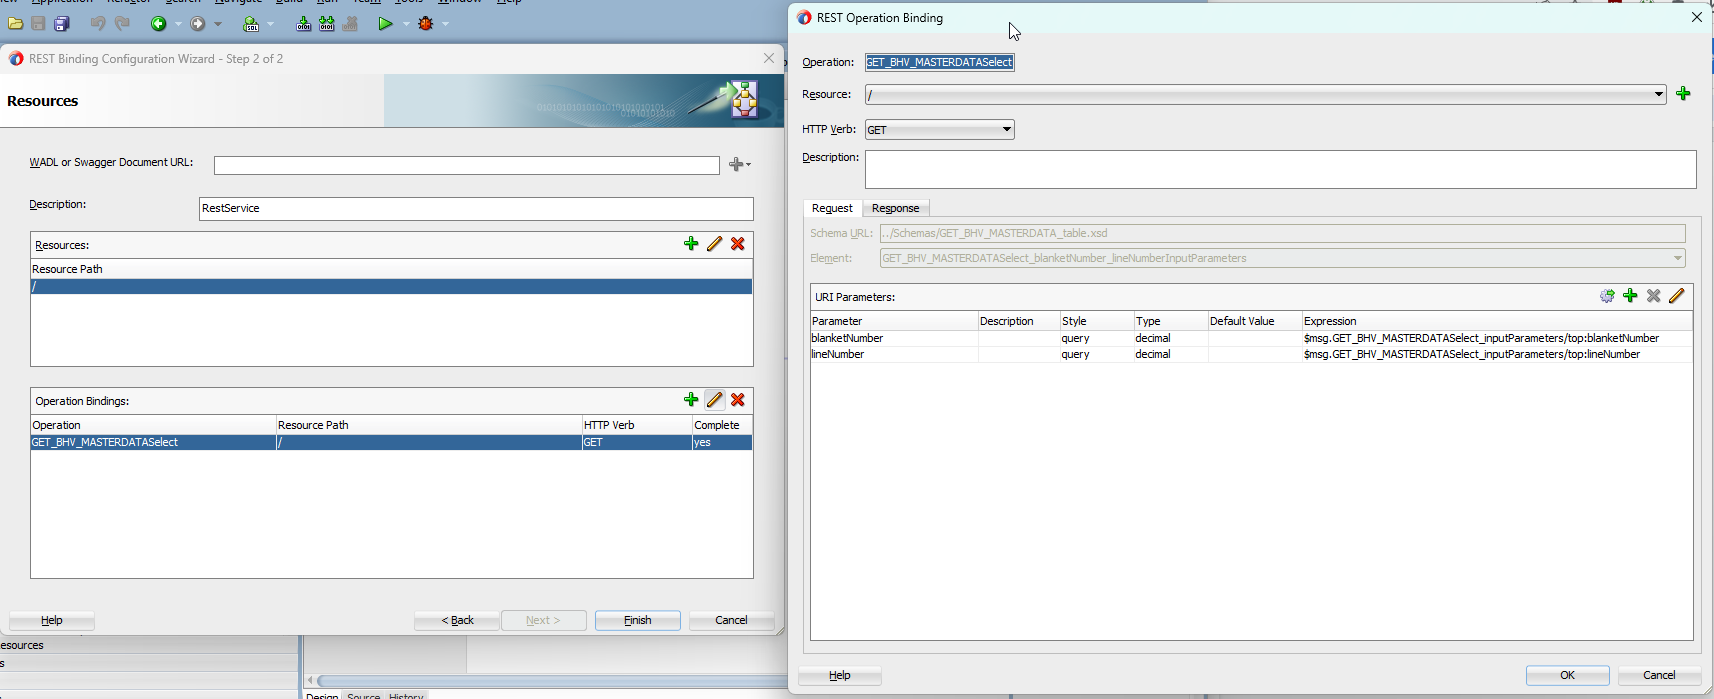
It just maps two URL query parameters to the WHERE condition of the SQL query:


REST Service Configuration

When the service is invoked, unfortunately, the JSON returned is not really “optimal”:

{
"XxisBlanketMatkoV" : [ {
"lineId" : 278000,
"shipSiteAddress1" : "PROMATIS software GmbH",
"shipSiteAddress2" : "Pforzheimer Str. 160",
"shipSiteAddress3" : {
"@nil" : "true"
},
"shipSiteAddress4" : {
"@nil" : "true"
},
"shipSiteCountry" : "DE",
"shipSitePlz" : "76275",
"bulkFlag" : "N"
} ]
}

Issues with initial version

This is ugly for two reasons:

  • One usually does not describe NULL values in JSON like that. It would be better to either “omit” the element “shipSiteAddress3” or have them set to “shipSiteAddress3”: null.
  • bulkFlag is a boolean, it would be better to have this as “bulkFlag” : false.

Of course, there is an obvious solution to this: Just add a mediator or even a BPEL process and do an XSLT transformation from the data from the Database Adapter to an explicit schema, and one can map Y/N to true/false over an xsl:if and is additionally able to e.g. omit the NULL elements based on xsl:if.

However, this is “one more thing” to maintain, and if the base SELECT changes, this transformation has to be adapted as well.

Producing better “null” values

Obviously, SOA Suite first extracts the data from the database column SHIP_SITE_ADDRESS4 (which in NULL) to an xml representation of

<shipSiteAddress3 xsi:nil=”true”/> and then translates that attribute into a json child “@nil”=true.

Luckily in the meantime, SOA Suite got a patch 31926382 (which is part of SOA Bundle Patch 12.2.1.4.221122). With that patch, according to 2764402.1, one is able to modify the XSD that defines the XML elements that in the end are converted to JSON as follows:


Modified XML Schema

just add:

xmlns:nxsd="http://xmlns.oracle.com/pcbpel/nxsd" nxsd:version="JSON" nxsd:encoding="UTF-8" nxsd:isNillableSupported="true"

and the @nil will be converted to “proper” null values.

true and false

Unfortunately, pure (Oracle) SQL does not support boolean data types in the database so far. This also makes it a bit difficult to produce true/false when fetching data through the JCA Database adapter of SOA Suite. I managed to fix this by doing the following:

  1. Returning 0 for false and 1 for true in the SQL field of “bulk_flag,
  2. modifying the or-mappings.xml to:
<attribute-mapping xsi:type="direct-mapping"
<attribute-name>bulkFlag</attribute-name>
<field table="XXIS_BLANKET_MATKO_V" name="BULK_FLAG" xsi:type="column"/>
<attribute-classification>java.lang.Boolean</attribute-classification>
</attribute-mapping>>

(Thus changing it from java.lang.Decimal to java.lang.Boolean.)

Summary: Prettier JSON

By implementing these two tiny changes:

  • Add nxsd:isNillableSupported=”true” to schema,
  • modify the or-mappings.xml to have <attribute-classification>java.lang.Boolean</attribute-classification> to

The REST service gives us:

{
"XxisBlanketMatkoV" : [ {
"lineId" : 278000,
"shipSiteAddress1" : "PROMATIS software GmbH",
"shipSiteAddress2" : "Pforzheimer Str. 160",
"shipSiteAddress3" :null,
"shipSiteAddress4" : null,
"shipSiteCountry" : "DE",
"shipSitePlz" : "76275",
"bulkFlag" : false
} ]
}

Which is way better JSON ?

CI/CD für Oracle-APEX-Anwendungen mit GitLab

CI/CD für Oracle-APEX-Anwendungen mit GitLab

Oracle Application Express (APEX) ist eine Low-Code-Plattform zur Erstellung von datenbasierten Webanwendungen, die direkt in einer Oracle-Datenbank installiert wird. Die Entwicklung einer solchen Webanwendung findet in der APEX-eigenen Entwicklungsumgebung statt. Dieser Artikel zeigt eine Möglichkeit auf, wie die Entstehung einer APEX-Applikation anhand CI/CD automatisiert auf verschiedene Umgebungen (TEST und PROD) ausgerollt werden kann.

Die Low-Code-Plattform Oracle APEX wird von Oracle seit vielen Jahren als Teil aller Datenbankeditionen entwickelt. Sie beinhaltet eine grafische Benutzeroberfläche zur Entwicklung von datenbasierten Webanwendungen und besteht neben der Benutzeroberfläche in der Regel aus zusätzlichen Oracle-Datenbank-Objekten (wie Tabellen, Packages usw.). Ein häufiges Problem bei der Nutzung von Oracle APEX in größeren Projekten ist der aufwendige, manuelle Prozess, um eine Applikation und alle dazugehörigen Komponenten von einer Umgebung, beispielsweise der Entwicklungsumgebung, auf eine andere Umgebung, wie die Testumgebung, zu übertragen. Hierzu müssen alle Datenbankobjekte, statische Daten sowie die Applikation selbst manuell von der Entwicklungsumgebung auf die Testumgebung und später auf die Produktivumgebung übertragen werden.

Oracle APEX besitzt hierfür seit der Version 20.1 ein eingebautes Feature namens Remote Deployment, das den Deployment-Prozess von einer Umgebung auf eine andere vereinfachen soll. Dennoch besteht der Remote-Deployment-Prozess aus vielen einzelnen Schritten, auf die bereits während der Entwicklung geachtet werden muss. So müssen beispielsweise Skripte zur Aktualisierung des Datenbankschemas manuell geschrieben und in der APEX-Applikation als Update-Skripte hinterlegt werden. Der Prozess des eigentlichen Deployments ist hier ebenfalls ein händischer Prozess. In der APEX-Entwicklungsoberfläche muss eine APEX-Applikation mit manuellen Klicks durch mehrere Masken auf der Zielumgebung installiert werden. Hierbei können sich durch die manuelle Durchführung und Komplexität der Weboberfläche immer wieder Fehler einschleichen.

Diese und weitere Probleme werden in der modernen Softwareentwicklung typischerweise anhand einer Automatisierung durch CI/CD gelöst. CI/CD beschreibt die Automatisierung des Tests, der Auslieferung und der Überwachung von Software. Der Prozessablauf hilft dabei, die Änderungen der Entwickler in kürzeren Intervallen auf den Haupt-Entwicklungszweig zu bringen. Darüber hinaus sorgt CI/CD mit automatischen Tests und Deployments für eine bessere Qualität sowie häufigere Releases einer Software.

Im weiteren Verlauf dieses Artikels zeigen wir auf, wie wir es geschafft haben, eine CI/CD-Pipeline für APEX-Applikationen aufzubauen, um diese erfolgreich bei Kunden einzusetzen.

Lesen Sie hier den kompletten Beitrag im Red Stack Magazin 02/2023.

Autor: Johannes Michler, Simon Grossmann

Bildquelle: © pixabay.com

Oracle Named a Leader in Gartner® Magic Quadrant™ for Integration Platform as a Service, Worldwide

Oracle Cloud Infrastructure integration services accelerate innovation and connect data ecosystems across distributed cloud environments

Oracle has been named a Leader and positioned highest for ‘Ability to Execute’ and the second position for ‘Vision of Completeness’ by Gartner in the 2023 “Magic Quadrant for Integration Platform as a Service (iPaaS), Worldwide.” The report recognized Oracle as a Leader for the sixth consecutive time.

To the report

Exposing NULL values and Booleans in JSON/REST with Oracle SOA Suite

Migrating E-Business Suite to File Storage Service

Johannes Michler PROMATIS Horus Oracle


Executive Vice President – Head of Platforms & Development

Recently, I described that starting with Release 22.2.1, the Oracle E-Business Suite Cloud Manager now supports OCI File Storage Service (FSS) besides block storage. Furthermore, the usage of FSS is mandatory for (new) multi-node environments: First Experience with E-Business Suite Cloud Manager 22.2.1

Given the advantages of FSS described in my previous blog one of my customers decided to migrate their apps-tier to File Storage Service. Let’s see how we did this:

Pre-Downtime

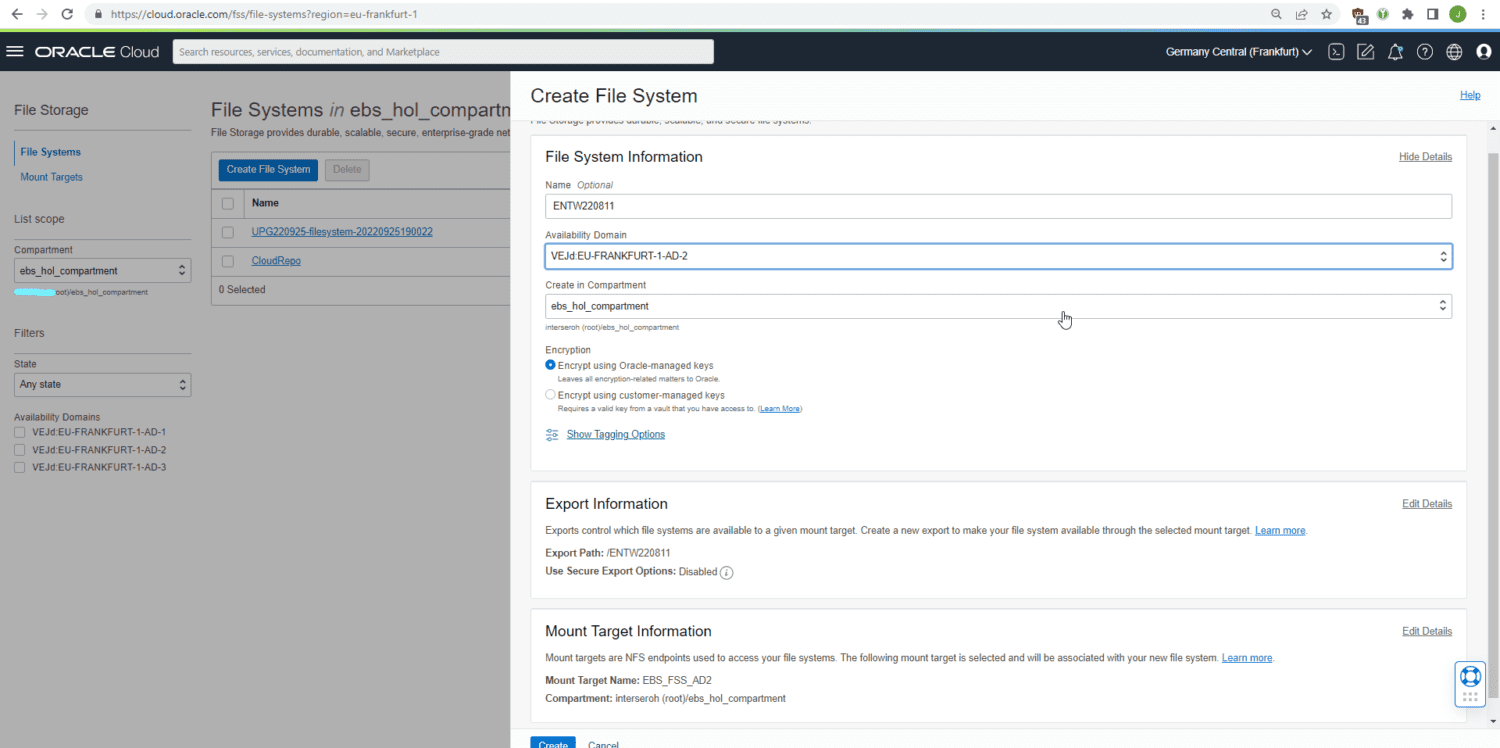
In preparation for the move first of all we had to create a new file system:

Creating the new file system.

This file system then has to be attached to a mount target and needs the proper export options:

NFS Export Options

Then, the mount point can be mounted in a temporary directory:

sudo mkdir /mnt/fss
sudo vi /etc/fstab
10.22.9.97:/ENTW220811 /mnt/fss nfs rw,bg,hard,timeo=600,nfsvers=3 0 0

Then:

sudo mount /mnt/fss
sudo chown oracle:oinstall /mnt/fss
sudo yum install -y fss-parallel-tools/

Downtime Operations

After these preparatory steps, we stop the entire environment and copy the content from the previous /u01 block volume over to the new FSS mount point /mnt/fss. Performance can be greatly improved by using fss-parallel-tools and parcp for this. For volumes of considerable size, an incremental operation can also be handy; but for the 300 GB one usually used for the apps-tier doing the migration in a 1-2 hours downtime is usually not a problem:

. setenv_run.s
adstpall.sh -mode=allnodes
~/stop_apex122.sh


sudo parcp --restore /u01/install /mnt/fss/


If working in a multi-node environment, then on the second apps-tier the mount through NFS to the primary apps-tier then needs to be replaced with a mount to the FSS mount target.

After the copy is finished, the old /u01/install mountpoint is retired and FSS is mounted to /u01:

sudo umount /u01
sudo vi /etc/fstab
10.22.9.97:/ENTW220811 /u01 nfs rw,bg,hard,timeo=600,nfsvers=3 0 0
sudo mount /u01

Then, start the apps-tier again:

. setenv_run.s
adstrtal.sh -mode=allnodes
~/start_apex122.shh

Post Downtime

After the downtime the old block volume should be detached through the OCI console. Furthermore, it is necessary to re-discover the environment in the E-Business Suite Cloud Manager. For this, either unregister the existing environment or (as I did in order to pick up the latest operating system image and add compatibility with the latest OCI shapes for the Cloud Manager) setup a new Cloud Manager environment. Make sure the Cloud Manager network profile is aware of the FSS Mount Target (usually, you have to create a new network profile for this).

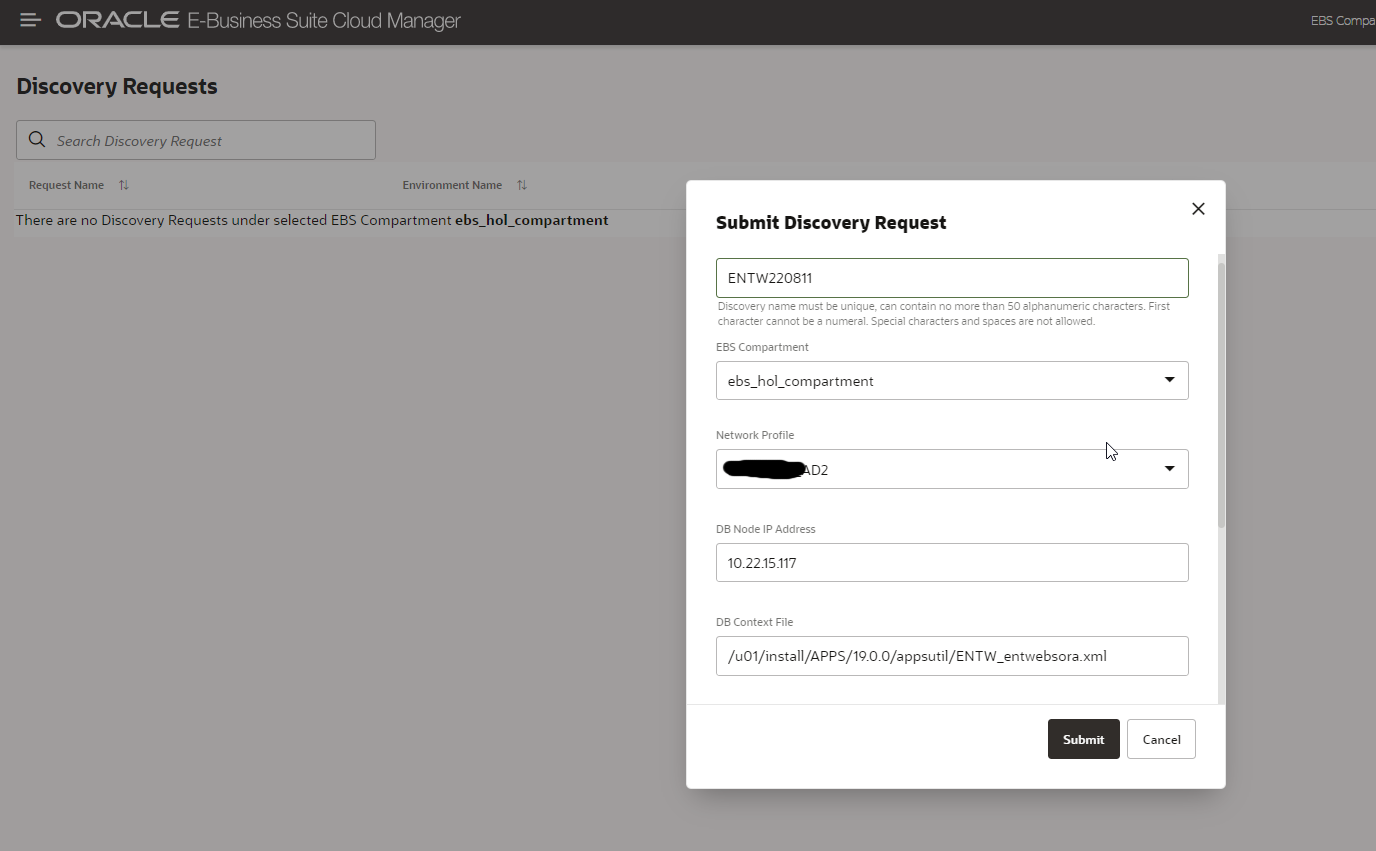
Then, issue a re-discovery request:

Rediscovery of the moved environment

Setup FSS Snapshots

FSS is a highly durable service. However, that does not help against e.g. user errors (issuing “rm -rf /u01”). To remedy this, it is helpful to setup FSS Snapshots with e.g. an hourly snapshot (kept for a day) plus a daily snapshot (kept for a week). Unfortunately, so far this cannot be setup from the OCI console. Furthermore, for FSS it is currently not possible to perform automatic backups to OCI object storage (this is on the roadmap, though). However, using the utility fss-scheduler, such a backup policy can be easily setup.

Costs

As described in my previous post, FSS is considerably more expensive “per gigabyte” (see the oci price list) compared to block storage: 30 cents compared to just around 4.5 cents per GB and month. However due to the “sparse” nature of FSS, for an environment with production plus 3 clones for dev/test our storage usage changed from 4x400GB=1200GB with block storage (equaling roughly 54 USD/month) to 200GB + (3*15) GB = 245 GB (which equals 74 USD/month). The relative increase in costs may still seem significant, compared with the total costs for hosting 4 E-Business Suite environments with terabytes of block storage for the database; these are, however, peanuts. The ratio might even improve if in the future, Oracle will eventually use FSS clones for creating the patch file system (see, and vote for my idea over there).

Summary

By performing the above steps, you can migrate an E-Business Suite apps-tier easily to File Storage Service in a downtime of about 1 hour. By doing so, this it is e.g. possible to create very fast clones that are furthermore “sparse”.

Oracle Integration Cloud Hybrid integrations with Oracle Connectivity Agent

Oracle Integration Cloud Hybrid integrations with Oracle Connectivity Agent

Yves Chassein PROMATIS


Senior Vice President – Head of Application Development

Overview

In integration projects, it is often needed to integrate cloud applications with on-prem systems running in the clients network. In most cases, the client network is not accessible from the internet. This situation makes the task of integrating this system for a cloud integration platform, such as the Oracle Integration Cloud (OIC), almost impossible.

Fortunately, the OIC comes with a functionality named Oracle Connectivity Agent (OCA). The small Java program that can be run as a service on a linux machine closes this gap. The OCA can currently work with the following OIC adapters as outbound (invoke) connection:


  • DB2
  • File
  • FTP
  • Microsoft SQL Server
  • MySQL Database
  • Oracle Database
  • Oracle E-Business Suite
  • REST
  • SAP
  • Siebel
  • SOAP
  • Kafka
  • WebLogic JMS
  • IBM MQ Series – JMS

As well as the following adapters as inbound (trigger) connection:

  • DB2
  • File
  • JMS
  • Microsoft SQL Server
  • MySQL Database
  • Oracle Database
  • Oracle E-Business Suite
  • SAP
  • Siebel
  • WebLogic JMS
  • IBM MQ Series – JMS

(Some) Advantages of the OCA are:

  • No ports need to be opened on the on-prem server,
  • all connections between COA und OCI will be SSL secured,
  • all communication is initiated from the OCA.

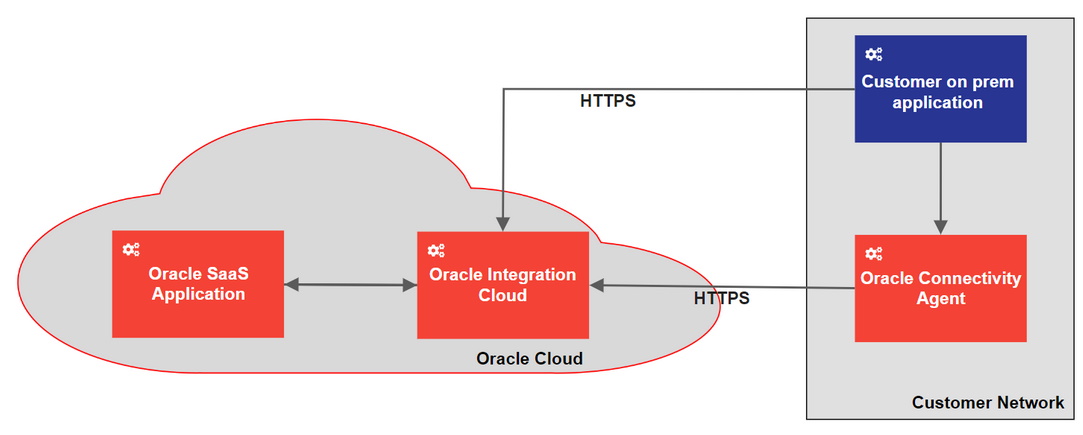
The basic pattern of how to use the OCA is the public internet pattern. In this pattern, the OAC will be installed in the customer network and communicate between the on-prem application and the OIC. The all connections will be via the public internet.

More information about the OCA can be found in the according Oracle Documentation (namely https://docs.oracle.com/en/cloud/paas/integration-cloud/agent.html) as well as in the related tutorial provided by Oracle (at https://docs.oracle.com/en/cloud/paas/integration-cloud/integrations-user/create-integration-exchange-messages-oracle-integration-and-local-host.html#GUID-F92564A0-8C6F-4C35-A5EE-B3F19571B616).

Installation

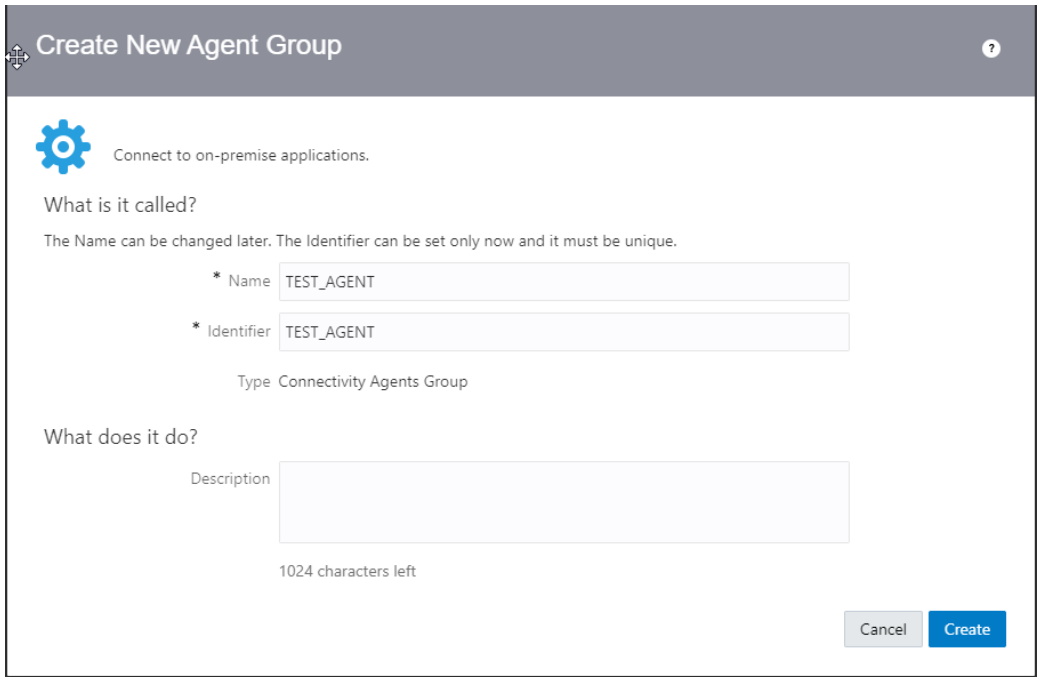
To create an OCA, you first need to login into the OIC, then navigate to „Integration“ – „Agents“ – „Create Agent Group“. The next step is to fill out the basic information for the OCA and save it.

After clicking “Create”, you should see the newly created agent in your agents list.

Next, download the agent ZIP file and copy it on the server, where the agent should run. Be aware that the agent cannot be run as a Windows service, so if you want to use the agent on a Windows server, the user must be logged in all the time. In the following, the explanation will apply to a Linux server.

After copying the files, unzip them into the folder where you want to store the data:

and modify the InstallerProfile.cfg

# Required Parameters
# oic_URL format should be https://hostname:sslPort
oic_URL=https://oic_host:ssl_port
agent_GROUP_IDENTIFIER=
#Proxy Parameters
proxy_HOST=
proxy_PORT=
proxy_USER=
proxy_PASSWORD=
proxy_NON_PROXY_HOSTS=

Check if JAVA_HOME is part of the PATH variable. If not, add it. After this, start the agent with:

java -jar connectivityagent.jar

If you want to run the connectivity agent as background service, you need to add
oic_USER=
oic_PASSWORD=

into the InstallerProfile.cfg and start it with

nohup java -jar connectivityagent.jar

After this, the agent is running and can be used. In the integration cloud, you will see now that the agent is running.

Conclusion

Unfortunately (currently), it is not possible to define a virtual cloud network for the OIC to create a site-to-site connection between the Oracle Cloud and the customers network, so that the OIC connectivity agent is a good way to access on-premise systems that are not exposed to the internet. It is important to know the limitations of the adapters together with the agent. We suggest an installation of the connectivity agent on a Linux server.