Migrating E-Business Suite to File Storage Service

Migrating E-Business Suite to File Storage Service

Johannes Michler PROMATIS Horus Oracle


Executive Vice President – Head of Platforms & Development

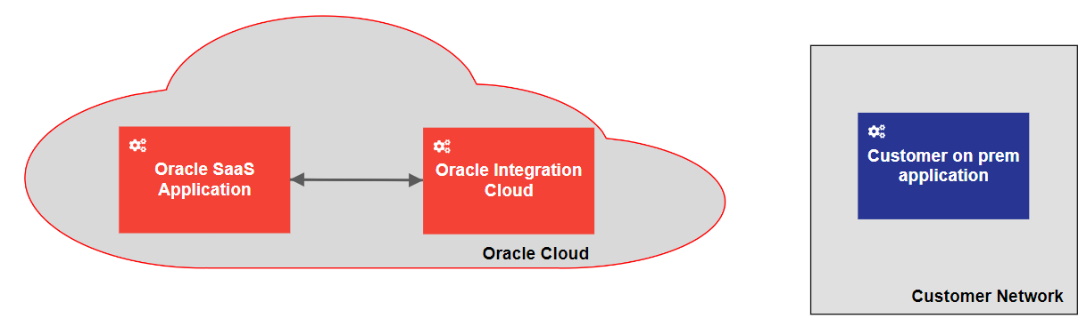
Recently, I described that starting with Release 22.2.1, the Oracle E-Business Suite Cloud Manager now supports OCI File Storage Service (FSS) besides block storage. Furthermore, the usage of FSS is mandatory for (new) multi-node environments: First Experience with E-Business Suite Cloud Manager 22.2.1

Given the advantages of FSS described in my previous blog one of my customers decided to migrate their apps-tier to File Storage Service. Let’s see how we did this:

Pre-Downtime

In preparation for the move first of all we had to create a new file system:

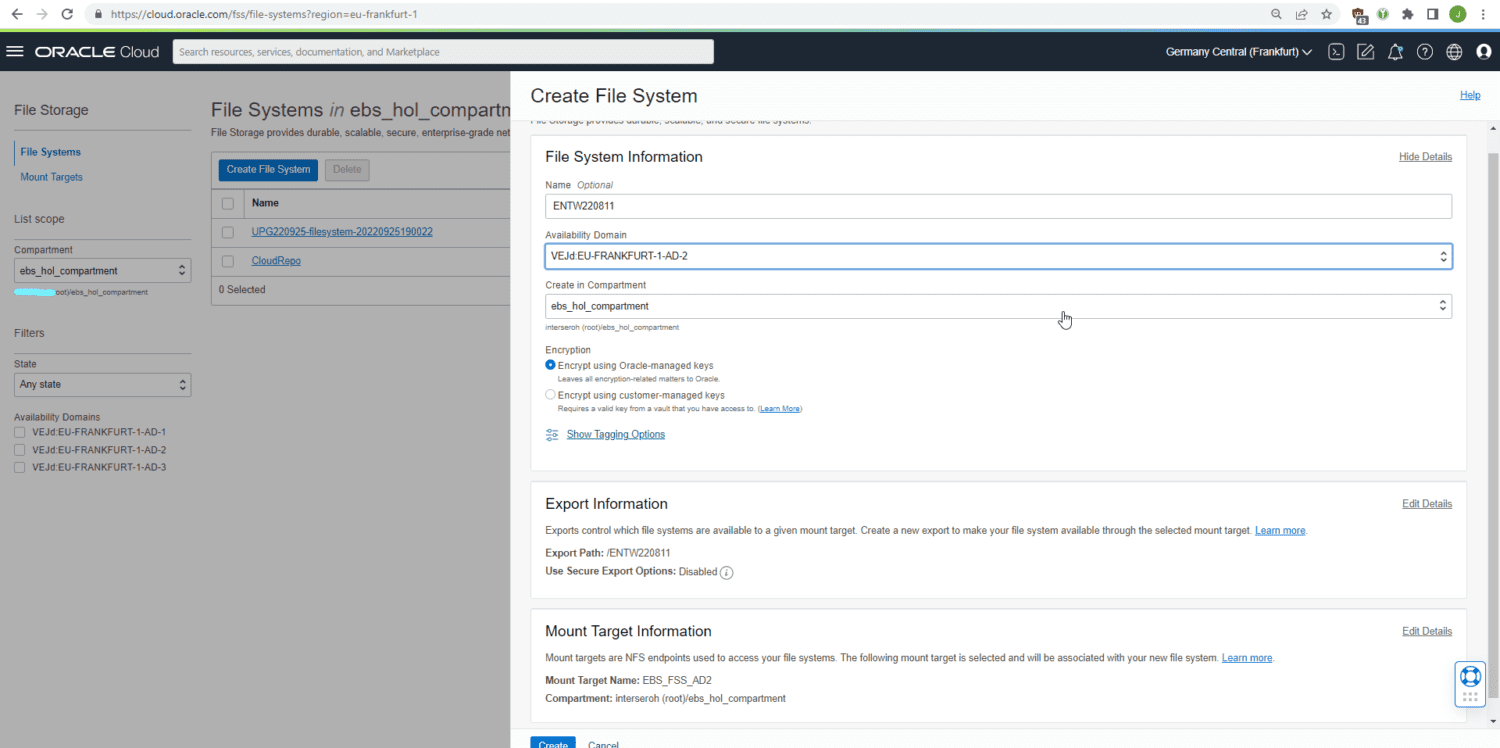
Creating the new file system.

This file system then has to be attached to a mount target and needs the proper export options:
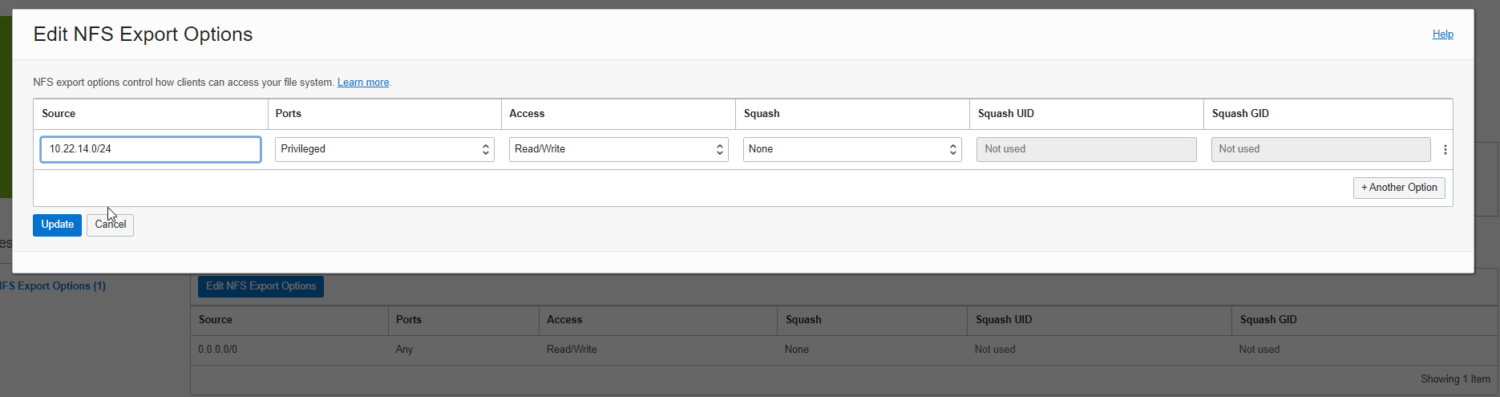
NFS Export Options

Then, the mount point can be mounted in a temporary directory:

sudo mkdir /mnt/fss
sudo vi /etc/fstab
10.22.9.97:/ENTW220811 /mnt/fss nfs rw,bg,hard,timeo=600,nfsvers=3 0 0

Then:

sudo mount /mnt/fss
sudo chown oracle:oinstall /mnt/fss
sudo yum install -y fss-parallel-tools/

Downtime Operations

After these preparatory steps, we stop the entire environment and copy the content from the previous /u01 block volume over to the new FSS mount point /mnt/fss. Performance can be greatly improved by using fss-parallel-tools and parcp for this. For volumes of considerable size, an incremental operation can also be handy; but for the 300 GB one usually used for the apps-tier doing the migration in a 1-2 hours downtime is usually not a problem:

. setenv_run.s
adstpall.sh -mode=allnodes
~/stop_apex122.sh


sudo parcp --restore /u01/install /mnt/fss/


If working in a multi-node environment, then on the second apps-tier the mount through NFS to the primary apps-tier then needs to be replaced with a mount to the FSS mount target.

After the copy is finished, the old /u01/install mountpoint is retired and FSS is mounted to /u01:

sudo umount /u01
sudo vi /etc/fstab
10.22.9.97:/ENTW220811 /u01 nfs rw,bg,hard,timeo=600,nfsvers=3 0 0
sudo mount /u01

Then, start the apps-tier again:

. setenv_run.s
adstrtal.sh -mode=allnodes
~/start_apex122.shh

Post Downtime

After the downtime the old block volume should be detached through the OCI console. Furthermore, it is necessary to re-discover the environment in the E-Business Suite Cloud Manager. For this, either unregister the existing environment or (as I did in order to pick up the latest operating system image and add compatibility with the latest OCI shapes for the Cloud Manager) setup a new Cloud Manager environment. Make sure the Cloud Manager network profile is aware of the FSS Mount Target (usually, you have to create a new network profile for this).

Then, issue a re-discovery request:

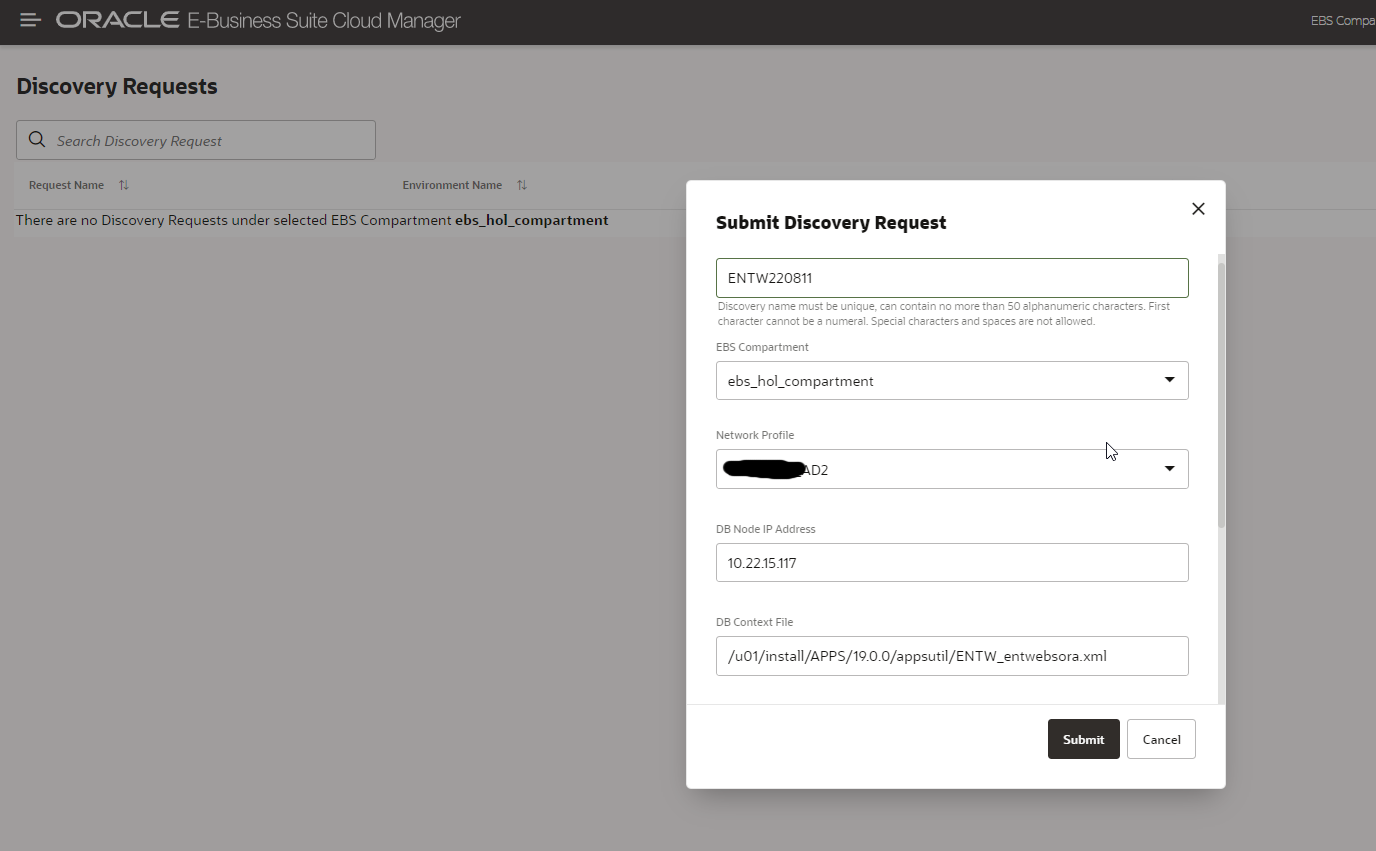
Rediscovery of the moved environment

Setup FSS Snapshots

FSS is a highly durable service. However, that does not help against e.g. user errors (issuing “rm -rf /u01”). To remedy this, it is helpful to setup FSS Snapshots with e.g. an hourly snapshot (kept for a day) plus a daily snapshot (kept for a week). Unfortunately, so far this cannot be setup from the OCI console. Furthermore, for FSS it is currently not possible to perform automatic backups to OCI object storage (this is on the roadmap, though). However, using the utility fss-scheduler, such a backup policy can be easily setup.

Costs

As described in my previous post, FSS is considerably more expensive “per gigabyte” (see the oci price list) compared to block storage: 30 cents compared to just around 4.5 cents per GB and month. However due to the “sparse” nature of FSS, for an environment with production plus 3 clones for dev/test our storage usage changed from 4x400GB=1200GB with block storage (equaling roughly 54 USD/month) to 200GB + (3*15) GB = 245 GB (which equals 74 USD/month). The relative increase in costs may still seem significant, compared with the total costs for hosting 4 E-Business Suite environments with terabytes of block storage for the database; these are, however, peanuts. The ratio might even improve if in the future, Oracle will eventually use FSS clones for creating the patch file system (see, and vote for my idea over there).

Summary

By performing the above steps, you can migrate an E-Business Suite apps-tier easily to File Storage Service in a downtime of about 1 hour. By doing so, this it is e.g. possible to create very fast clones that are furthermore “sparse”.

Oracle named as a Leader in the 2022 Gartner® Magic Quadrant™ for Configure, Price and Quote Application Suites

Oracle has been named as a Leader in the Magic Quadrant due to its market presence, comprehensive CPQ functionality and the scope of its quote-to-cash offerings.

Oracle CPQ enables your sales team to offer the right product at the right price with an intuitive solution that accelerates sales processes and grows revenue. Using Oracle Sales and CPQ, you can solve the most complex configuration requirements at scale with intelligent recommendations to guide even the largest transactions.

To the report.

Oracle Integration Cloud Hybrid integrations with Oracle Connectivity Agent

Oracle Integration Cloud Hybrid integrations with Oracle Connectivity Agent

Yves Chassein PROMATIS


Senior Vice President – Head of Application Development

Overview

In integration projects, it is often needed to integrate cloud applications with on-prem systems running in the clients network. In most cases, the client network is not accessible from the internet. This situation makes the task of integrating this system for a cloud integration platform, such as the Oracle Integration Cloud (OIC), almost impossible.

Fortunately, the OIC comes with a functionality named Oracle Connectivity Agent (OCA). The small Java program that can be run as a service on a linux machine closes this gap. The OCA can currently work with the following OIC adapters as outbound (invoke) connection:


  • DB2
  • File
  • FTP
  • Microsoft SQL Server
  • MySQL Database
  • Oracle Database
  • Oracle E-Business Suite
  • REST
  • SAP
  • Siebel
  • SOAP
  • Kafka
  • WebLogic JMS
  • IBM MQ Series – JMS

As well as the following adapters as inbound (trigger) connection:

  • DB2
  • File
  • JMS
  • Microsoft SQL Server
  • MySQL Database
  • Oracle Database
  • Oracle E-Business Suite
  • SAP
  • Siebel
  • WebLogic JMS
  • IBM MQ Series – JMS

(Some) Advantages of the OCA are:

  • No ports need to be opened on the on-prem server,
  • all connections between COA und OCI will be SSL secured,
  • all communication is initiated from the OCA.

The basic pattern of how to use the OCA is the public internet pattern. In this pattern, the OAC will be installed in the customer network and communicate between the on-prem application and the OIC. The all connections will be via the public internet.

More information about the OCA can be found in the according Oracle Documentation (namely https://docs.oracle.com/en/cloud/paas/integration-cloud/agent.html) as well as in the related tutorial provided by Oracle (at https://docs.oracle.com/en/cloud/paas/integration-cloud/integrations-user/create-integration-exchange-messages-oracle-integration-and-local-host.html#GUID-F92564A0-8C6F-4C35-A5EE-B3F19571B616).

Installation

To create an OCA, you first need to login into the OIC, then navigate to „Integration“ – „Agents“ – „Create Agent Group“. The next step is to fill out the basic information for the OCA and save it.

After clicking “Create”, you should see the newly created agent in your agents list.

Next, download the agent ZIP file and copy it on the server, where the agent should run. Be aware that the agent cannot be run as a Windows service, so if you want to use the agent on a Windows server, the user must be logged in all the time. In the following, the explanation will apply to a Linux server.

After copying the files, unzip them into the folder where you want to store the data:

and modify the InstallerProfile.cfg

# Required Parameters
# oic_URL format should be https://hostname:sslPort
oic_URL=https://oic_host:ssl_port
agent_GROUP_IDENTIFIER=
#Proxy Parameters
proxy_HOST=
proxy_PORT=
proxy_USER=
proxy_PASSWORD=
proxy_NON_PROXY_HOSTS=

Check if JAVA_HOME is part of the PATH variable. If not, add it. After this, start the agent with:

java -jar connectivityagent.jar

If you want to run the connectivity agent as background service, you need to add
oic_USER=
oic_PASSWORD=

into the InstallerProfile.cfg and start it with

nohup java -jar connectivityagent.jar

After this, the agent is running and can be used. In the integration cloud, you will see now that the agent is running.

Conclusion

Unfortunately (currently), it is not possible to define a virtual cloud network for the OIC to create a site-to-site connection between the Oracle Cloud and the customers network, so that the OIC connectivity agent is a good way to access on-premise systems that are not exposed to the internet. It is important to know the limitations of the adapters together with the agent. We suggest an installation of the connectivity agent on a Linux server.

Oracle ACE Director Award for Johannes Michler!

Oracle ACE Director Award for Johannes Michler!


PROMATIS congratulates Johannes Michler, Executive Vice President Platforms & Development, on the Oracle ACE Director Award! The Award stands for exceptional technical skills and knowledge about Oracle products, as well as a continued joy of sharing said knowledge with the community through blogs, articles, conference presentations, podcasts, YouTube videos, social media activities, the participation in Oracle Community forums, the organization of events, the writing of newsletters and much more.

Congratulations, Johannes!

Click here to visit his blog.